Why Incoming Screen QC Should Go Beyond Bench Testing

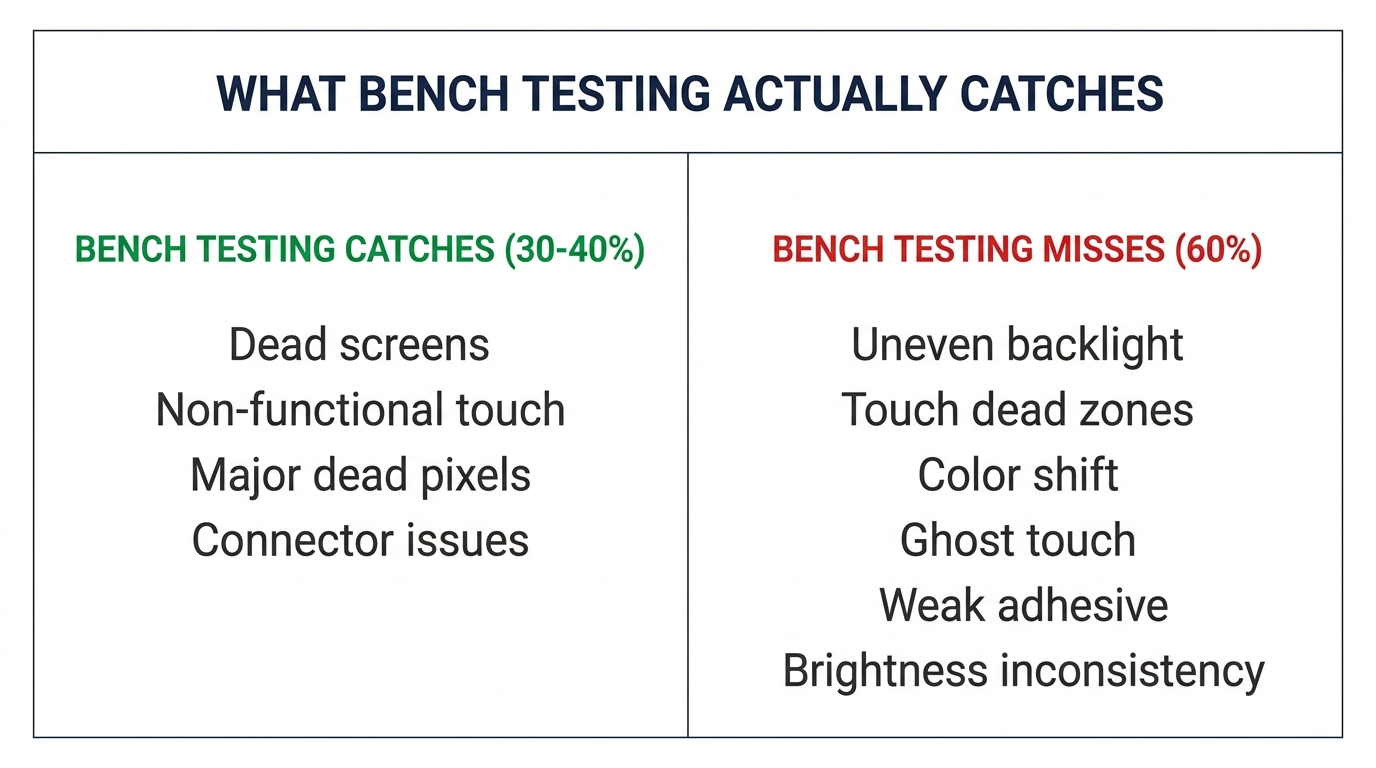
Most repair shops do incoming screen QC the same way: connect the screen to a test board or phone, power it on, check for display and touch response. If the screen lights up and responds to touch, it passes. This is bench testing — and it catches roughly 30–40% of the defects that will actually cause customer problems.
The other 60% — uneven brightness, color shift at angles, slow touch response in cold weather, adhesive failures after 2 weeks, dead pixels that only appear at certain brightness levels — these pass bench testing and get discovered by your customer after installation. That's when the callback happens, the re-do eats your labor, and your reputation takes a hit.
Effective incoming screen QC takes 2–3 minutes per screen (not per batch — per screen on your sample set) and catches problems before they reach the customer. Here's what bench testing misses and how to build a better process.
Sourcing Replacement Screens in Bulk?
Incell / Hard OLED / Soft OLED grades — wholesale pricing, grade comparison on request.
Get Wholesale QuoteWhat Bench Testing Actually Catches (and What It Doesn't)
Bench testing is a binary pass/fail: does the screen turn on and does touch work? That's valuable — it filters out dead-on-arrival screens. But it has fundamental blind spots.
What bench testing catches:
- Completely dead screens (no display output)
- Non-functional touch (no response at all)
- Major display defects (large dead pixel clusters, broken LCD lines)
- Connector issues (screen doesn't communicate with board)
What bench testing misses:
| Defect Type | Why Bench Testing Misses It | When Customer Discovers It |
|---|---|---|
| Uneven backlight (clouding) | Not visible in bright shop lighting | At night, on dark backgrounds |
| Touch dead zones | Small areas, not caught with a quick swipe test | During typing or gaming |
| Color temperature shift | Requires side-by-side comparison with known-good screen | Immediately if customer is color-sensitive |
| Slow touch response | Feels fine at room temperature, fails in cold | Winter, outdoor use |
| Ghost touch | Intermittent — may not trigger during 30-second bench test | Randomly after installation |
| Weak adhesive/frame bond | Screen sits in frame fine initially | Pops or separates after days/weeks of pocket pressure |
| Brightness inconsistency | Slight dimming at edges, only visible at max brightness | Outdoor use in sunlight |
These "invisible" defects are what generate callbacks. And they're particularly common in mid-grade aftermarket screens (Incell and Hard OLED), which is exactly what most repair shops stock in volume.
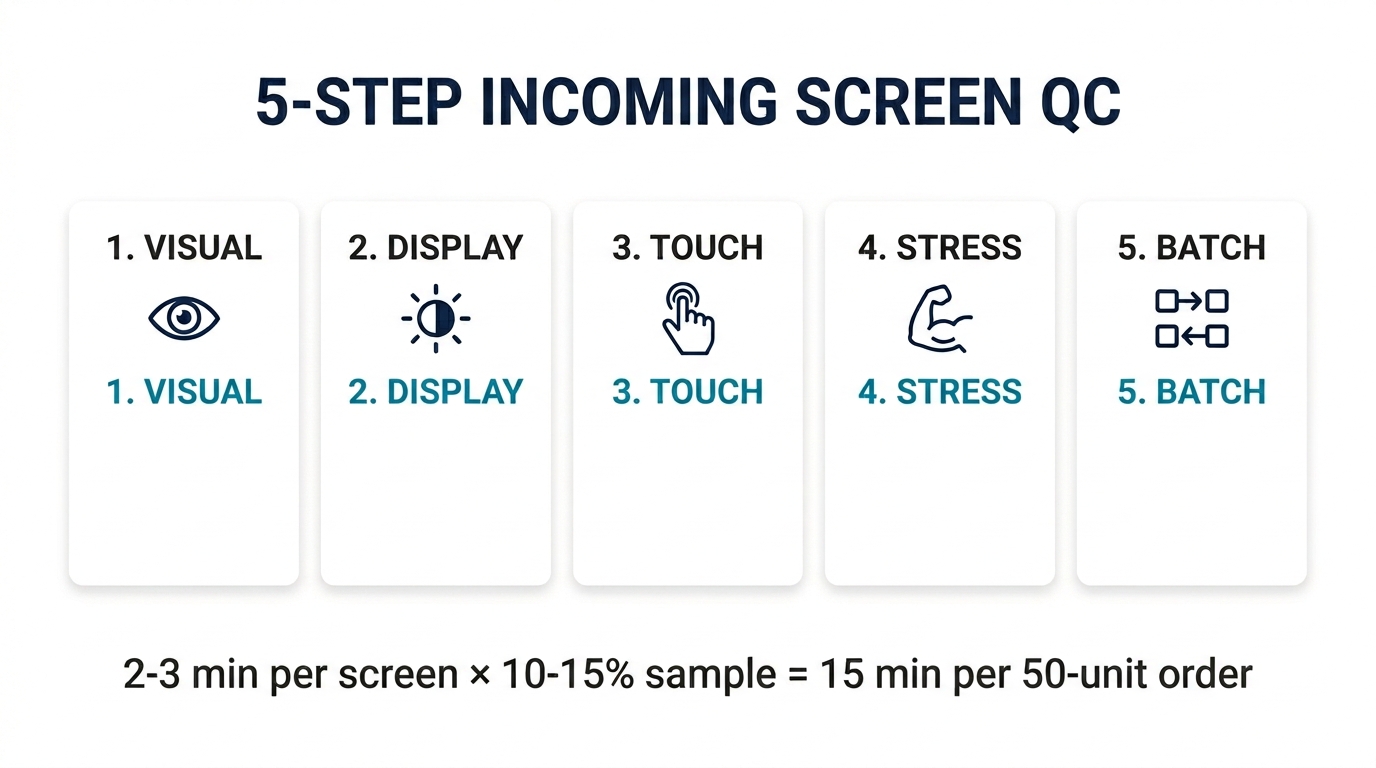
The 5-Step Incoming Screen QC Process
This process is designed for batch-level incoming inspection — not testing every single screen, but sampling enough from each shipment to catch systemic quality issues before they reach customers.
Step 1: Visual Inspection (30 seconds per screen)
Before powering anything on, physically inspect the screen:
- Frame alignment: Hold the screen at eye level and check that the display panel sits flush in the frame. Any gap, lift, or unevenness indicates poor bonding — this screen will separate under daily use.
- Flex cable condition: Check for kinks, tears, or bends in the flex cable. Damaged flex cables cause intermittent display issues that are nearly impossible to diagnose after installation.
- Protective film: OEM and quality aftermarket screens ship with a clean, bubble-free protective film. Wrinkled, dirty, or misaligned film often correlates with lower QC standards at the factory.
- Adhesive rings: Check pre-applied adhesive around the screen edge. Incomplete or uneven adhesive means you'll need to add your own — adding labor time and inconsistent results.
Step 2: Display Quality Under Controlled Conditions (60 seconds)
Power the screen on a test board, but go beyond the "does it light up" check:
- Full white screen: Display a pure white image at maximum brightness. Look for yellow or blue tinting, especially at corners and edges. Uneven tinting = poor backlight or polarizer quality.
- Full black screen: In a dimly lit area, display a pure black image. On OLED screens, this should be truly black. On LCD/Incell screens, look for light bleed at the edges — some is normal, excessive bleed is a defect.
- Brightness ramp: Go from minimum to maximum brightness slowly. Watch for any flickering, stepping (instead of smooth transition), or sudden brightness jumps. These indicate driver IC issues.
- Viewing angles: Tilt the screen 45° in each direction. Significant color shift or brightness drop at moderate angles suggests lower-grade display panel or polarizer.
Step 3: Touch Response Testing (60 seconds)
Bench testing typically involves a few swipes. Proper touch testing requires:
- Full-screen touch map: Use a touch test app or drawing app to draw lines across every area of the screen — edges, corners, and center. Look for any area where the line breaks, skips, or doesn't register.
- Multi-touch: Place 3–4 fingers on the screen simultaneously. All should register. Cheap touch ICs often drop multi-touch to 2–3 points.
- Edge responsiveness: Swipe from the very edge of the screen inward. Edge touch is where aftermarket screens fail most often — the touch digitizer coverage doesn't extend to the full display area.
- Pressure consistency: Press lightly and firmly in the same spot. Both should register identically. Inconsistent pressure response = touch IC calibration issue.
Step 4: Stress Indicators (30 seconds)
Quick checks that reveal how the screen will perform under real-world conditions:
- Flex test: Gently apply slight pressure to the center of the screen (not enough to damage — just enough to flex it 1–2mm). Release and check if the display shows any distortion or temporary artifacts. Screens with poor lamination will show temporary spots or lines under flex.
- Connector fit: Insert and remove the flex cable connector from the test board 2–3 times. It should seat firmly with consistent resistance. Loose connectors lead to intermittent display loss after installation.
Step 5: Batch Consistency Check
This is the step that separates professional incoming QC from ad-hoc testing:
- Sample 10–15% of the batch (minimum 3 screens for small orders, 5–8 for orders of 50+)
- Compare side by side: Power on 3–4 screens simultaneously and display the same white/gray image. Are the color temperatures consistent? If one screen is noticeably warmer or cooler than the others, the batch may contain mixed-source panels.
- Document your findings: Note the batch number, supplier, date, and any defects found. Over time, this log becomes your most valuable tool for evaluating suppliers — you'll see patterns that individual tests can't reveal.
Want screens that have already been through batch-level QC? PRSPARES tests every incoming batch with the process above and provides grade-specific documentation. Request screens with QC data.
How to Use Your QC Results
Testing is only useful if it changes your decisions. Here's how to act on what you find:
0 defects in sample: The batch is good. Install with confidence. Note the supplier and batch for future reference — this is your quality baseline.
1–2 minor defects in sample (slight color variation, minor edge light bleed): The batch is acceptable for most customers. Consider testing a few additional screens to determine if the defects are isolated or systemic. If isolated, pull those specific screens and use them for less demanding repairs (secondary phones, trade-in devices).
3+ defects in sample OR any major defect (dead pixels, touch dead zones, ghost touch): Contact your supplier immediately with documentation. Do not install any screens from this batch until the issue is resolved. A 3+ defect rate in a 10% sample suggests a batch-level quality problem that will generate customer callbacks at an unacceptable rate.
Inconsistent batch (screens look like they come from different sources — different color temperatures, different frame finishes, different flex cable markings): This is a red flag about your supplier's sourcing stability. Even if each individual screen passes, batch inconsistency means the supplier is pulling from multiple sources with varying quality levels. Raise this with them — it affects your ability to deliver consistent repair quality. (See our guide on verifying original phone screens for more on spotting mixed-source batches.)
Building Incoming Screen QC Into Your Workflow
The biggest barrier to proper QC isn't knowledge — it's time. Here's how to make it sustainable:
For sample/test orders: Run the full 5-step process on every screen. This is your investment in evaluating the supplier.
For regular bulk orders from a trusted supplier: Sample 10% with the full process. If 3 consecutive orders pass with zero defects, you can reduce to 5% sampling — but never skip it entirely. Suppliers change their own sources over time, and quality can shift without notice.
For new batches from an existing supplier: If the price, lead time, or packaging looks different from previous orders, treat it like a first order and increase your sample rate back to 15%.
Time investment: The full 5-step process takes about 2–3 minutes per screen. For a 50-unit order at 10% sampling, that's 15 minutes total. Compare that to the 30–45 minutes a single callback repair costs (customer communication + removal + reinstallation + potential new screen), and the math is clear.
Frequently Asked Questions
Can I just test screens by installing them in a phone instead of using a test board?
You can, but it's slower and riskier. Installing a screen in a phone takes 5–10 minutes; connecting to a test board takes 30 seconds. For QC sampling, speed matters. Also, repeated installation/removal increases the risk of damaging the phone's connector. A basic test board costs $15–30 and pays for itself after a few batches.
How do I know if a defect is worth rejecting the batch or just pulling individual screens?
Rule of thumb: if the defect would cause a customer to return within 30 days, it's worth flagging. Cosmetic variations (slightly different color warmth) are pullable — set those aside for less demanding jobs. Functional defects (touch dead zones, ghost touch, flickering) are batch-level concerns — test more screens immediately and contact your supplier.
Should I do incoming QC on batteries and small parts too?
Yes, but the process is different. For batteries, focus on voltage testing and visual inspection (see our guide on battery reset scams). For small parts (charging ports, speakers, cameras), bench testing is more reliable since these are binary pass/fail components — they either work or they don't. Screens are unique because they have a wide spectrum of "works but poorly."
Stop Relying on Bench Testing Alone
Bench testing is the minimum — the equivalent of checking that a car starts before buying it. Your incoming screen QC process should answer a harder question: will this screen still perform well in the customer's hands, in real conditions, after 30 days?
The 5-step process above takes minutes per sample, costs nothing beyond the test board you probably already own, and prevents the callbacks that cost you hours and customer trust. Build it into your workflow as a non-negotiable step between receiving inventory and installing it.
Looking for screens that arrive pre-tested? PRSPARES runs batch-level QC on every shipment — display quality, touch mapping, and consistency checks — so you spend less time testing and more time repairing. See our screen grades and QC standards.
Related reading: How to Verify Original Phone Screens Without Trusting Supplier Labels | Common iPhone Screen Quality Problems Wholesale Buyers Should Check