iPhone Boot Loop After Screen Replacement: 6 Causes and How to Fix Each One
The screen looked perfect. Touch worked. Face ID confirmed. You handed the phone back, the customer walked out — and 20 minutes later they're standing at your counter again with an iPhone stuck on the Apple logo.
If you've done enough screen replacements, this has happened to you. An iPhone boot loop after screen replacement is one of the most frustrating callbacks in the repair business because the screen itself usually isn't the problem. The real culprit is almost always a flex cable, a connector, or a component that got disturbed during disassembly.
Here's the short version: the #1 cause is a damaged or disconnected earpiece/proximity sensor flex. Causes #2 through #6 are front camera flex failure, faulty aftermarket screen ICs, improperly seated connectors, long screw damage, and battery issues. This article walks through each one with the exact diagnostic steps to isolate the fault in under 15 minutes.
But first, you need to know which type of failure you're actually dealing with — because "boot loop" means three different things.
Sourcing Replacement Screens in Bulk?
Incell / Hard OLED / Soft OLED grades — wholesale pricing, grade comparison on request.
Get Wholesale QuoteBoot Loop vs. 3-Minute Restart vs. Restore Error
Technicians use "boot loop" loosely, but these are three distinct conditions with different diagnostic paths. Treating them the same wastes time.
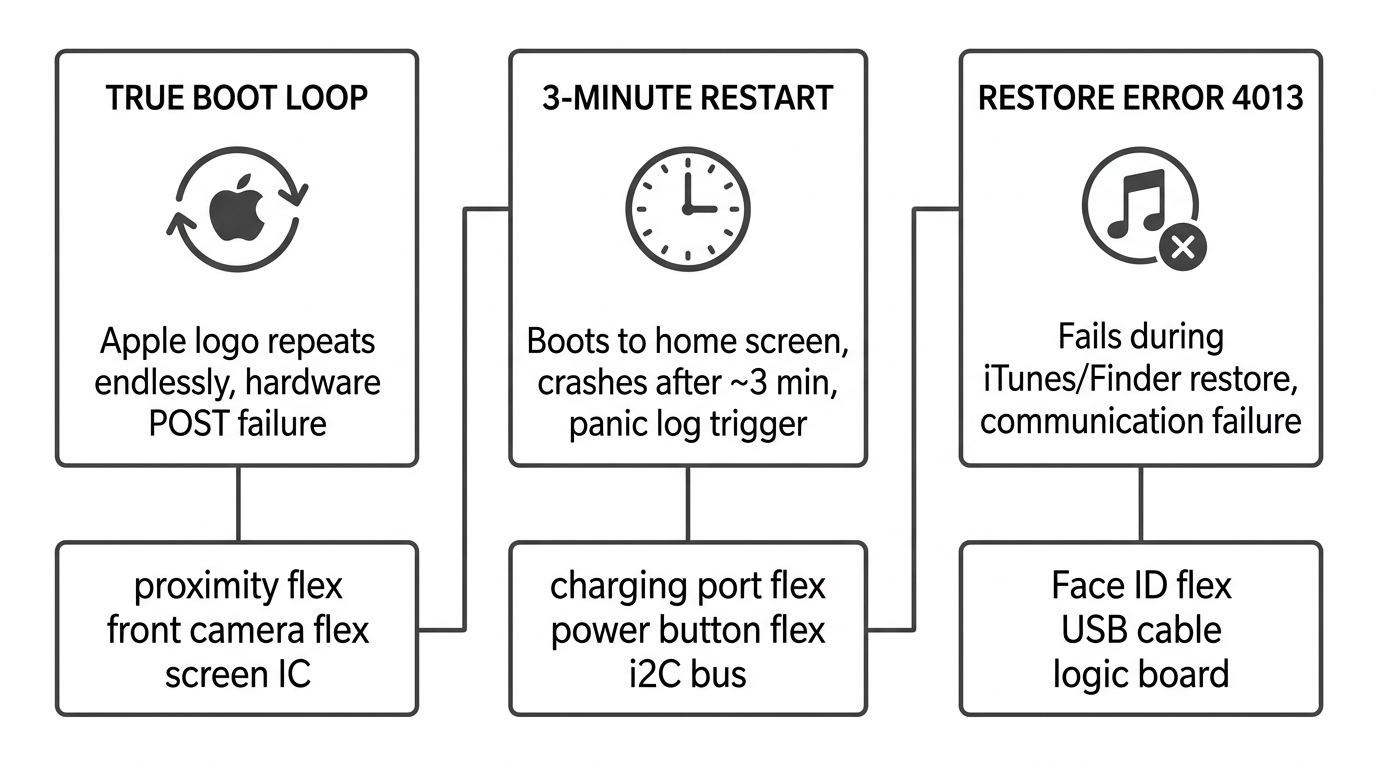
True boot loop (Apple logo cycle): The phone shows the Apple logo, gets partway through startup, then restarts. Over and over. This happens when a hardware component fails its handshake with the CPU during POST (Power-On Self Test). As one experienced tech on r/mobilerepair put it: "A boot loop is simply Apple's version of a failed POST. It hits an error during boot so just restarts."
3-minute panic restart: The phone actually boots to the home screen, but crashes and restarts after roughly 3 minutes. This is a different beast — usually caused by an aftermarket charging port flex, power button flex, or an i2C bus fault from water damage. If your customer says "it works for a few minutes then dies," you're dealing with this, not a true boot loop.
Restore error (4013/4005): The phone won't restore through iTunes or Finder. Error 4013 specifically points to a communication failure during the restore process — often a damaged Face ID flex or a logic board issue. If you're seeing 4013 after a screen swap, check the front camera assembly first.
Knowing which type you're facing determines where you start diagnosing.
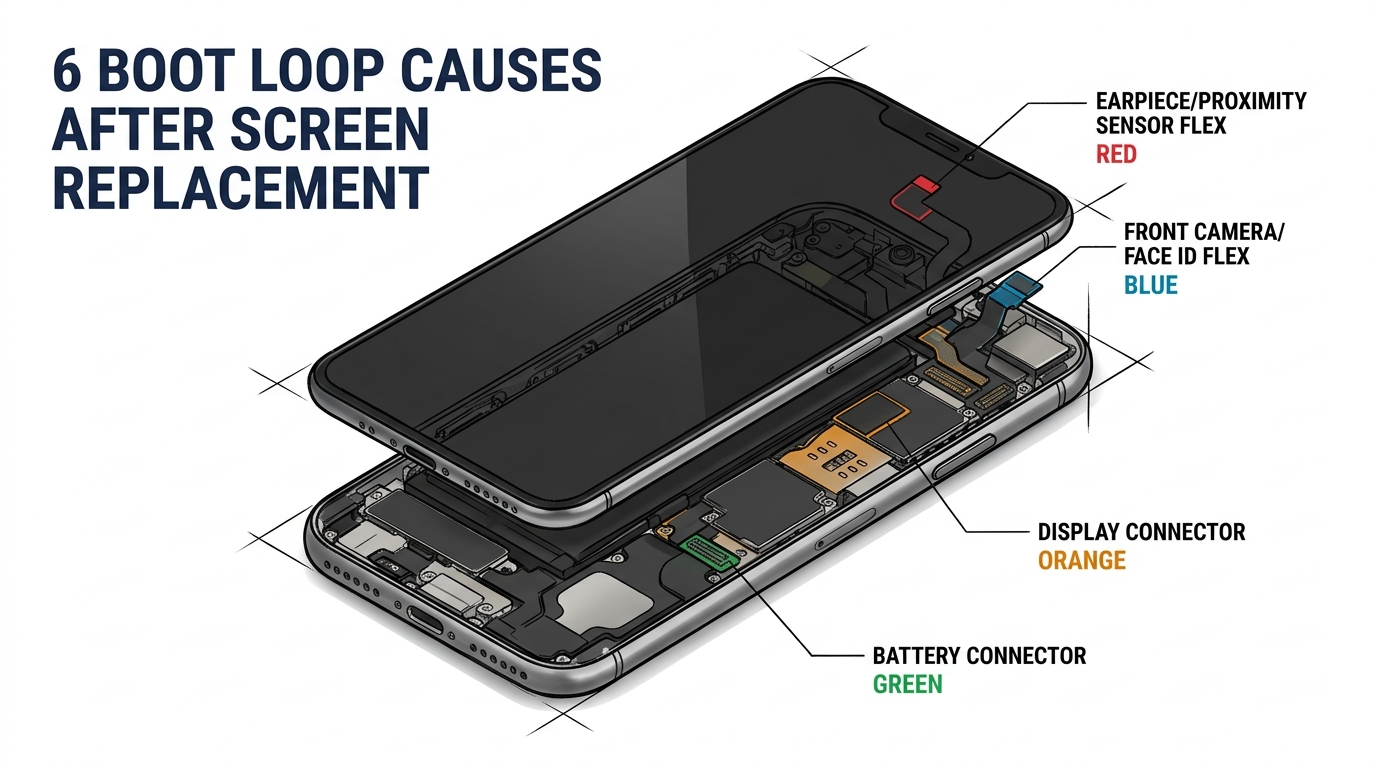
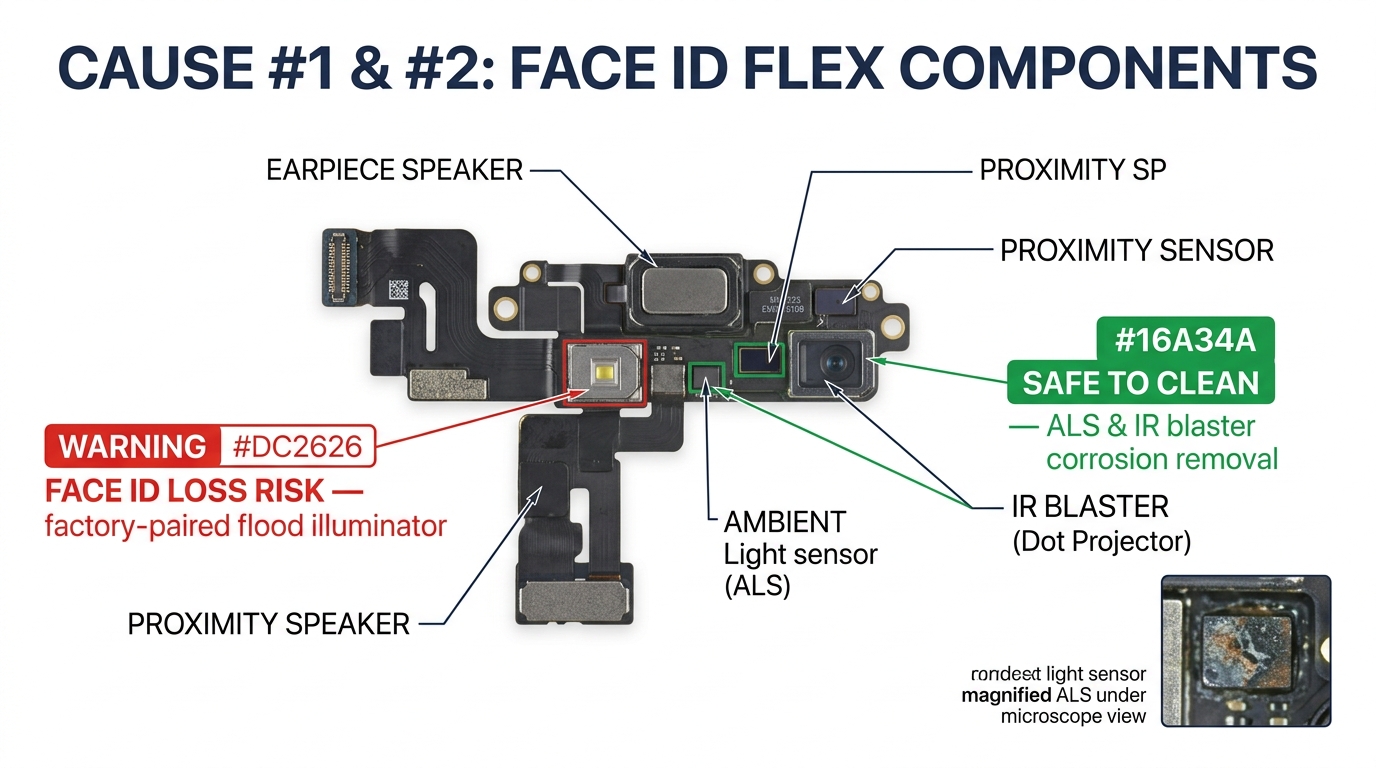
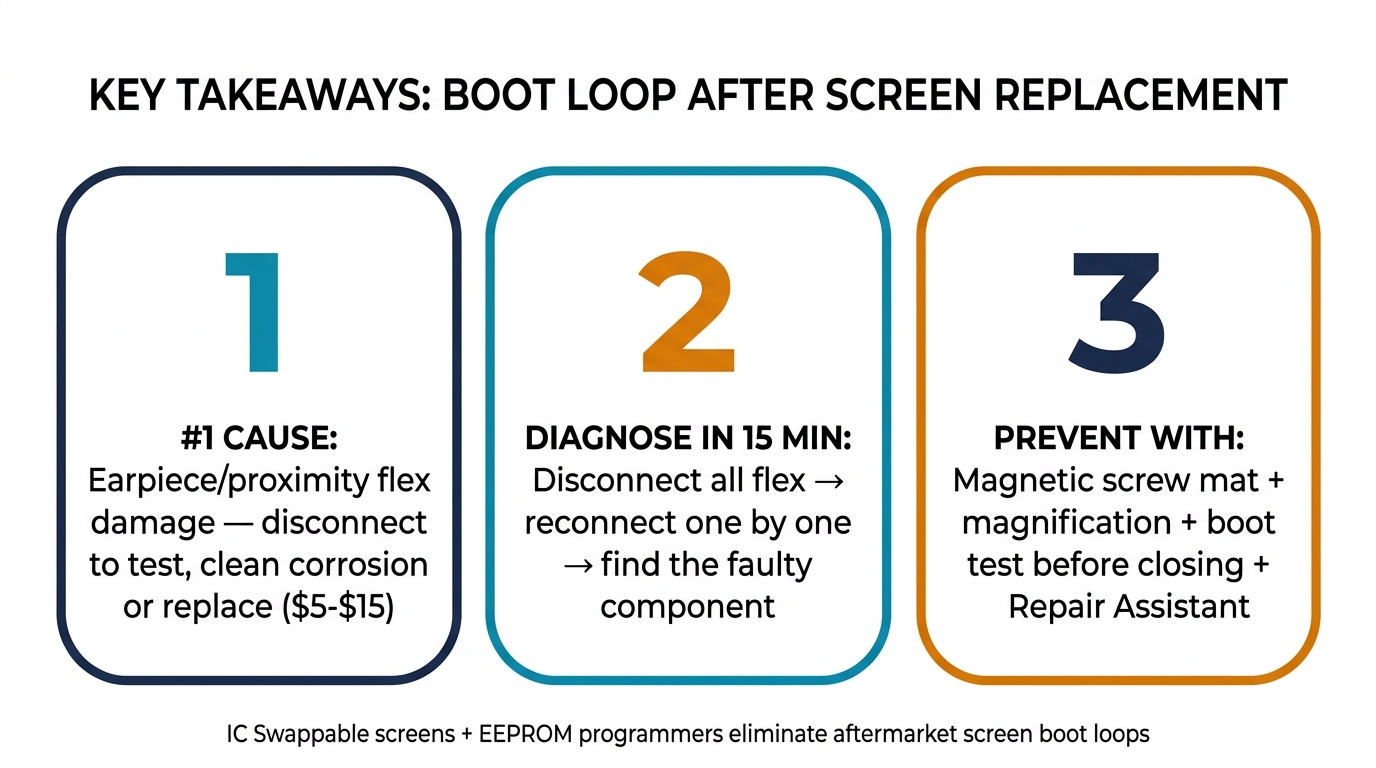
Cause #1: Damaged Earpiece or Proximity Sensor Flex
This is the single most common hardware cause of boot loops after screen replacement, confirmed across dozens of r/mobilerepair threads, iFixit Q&A posts, and multiple YouTube teardown channels.
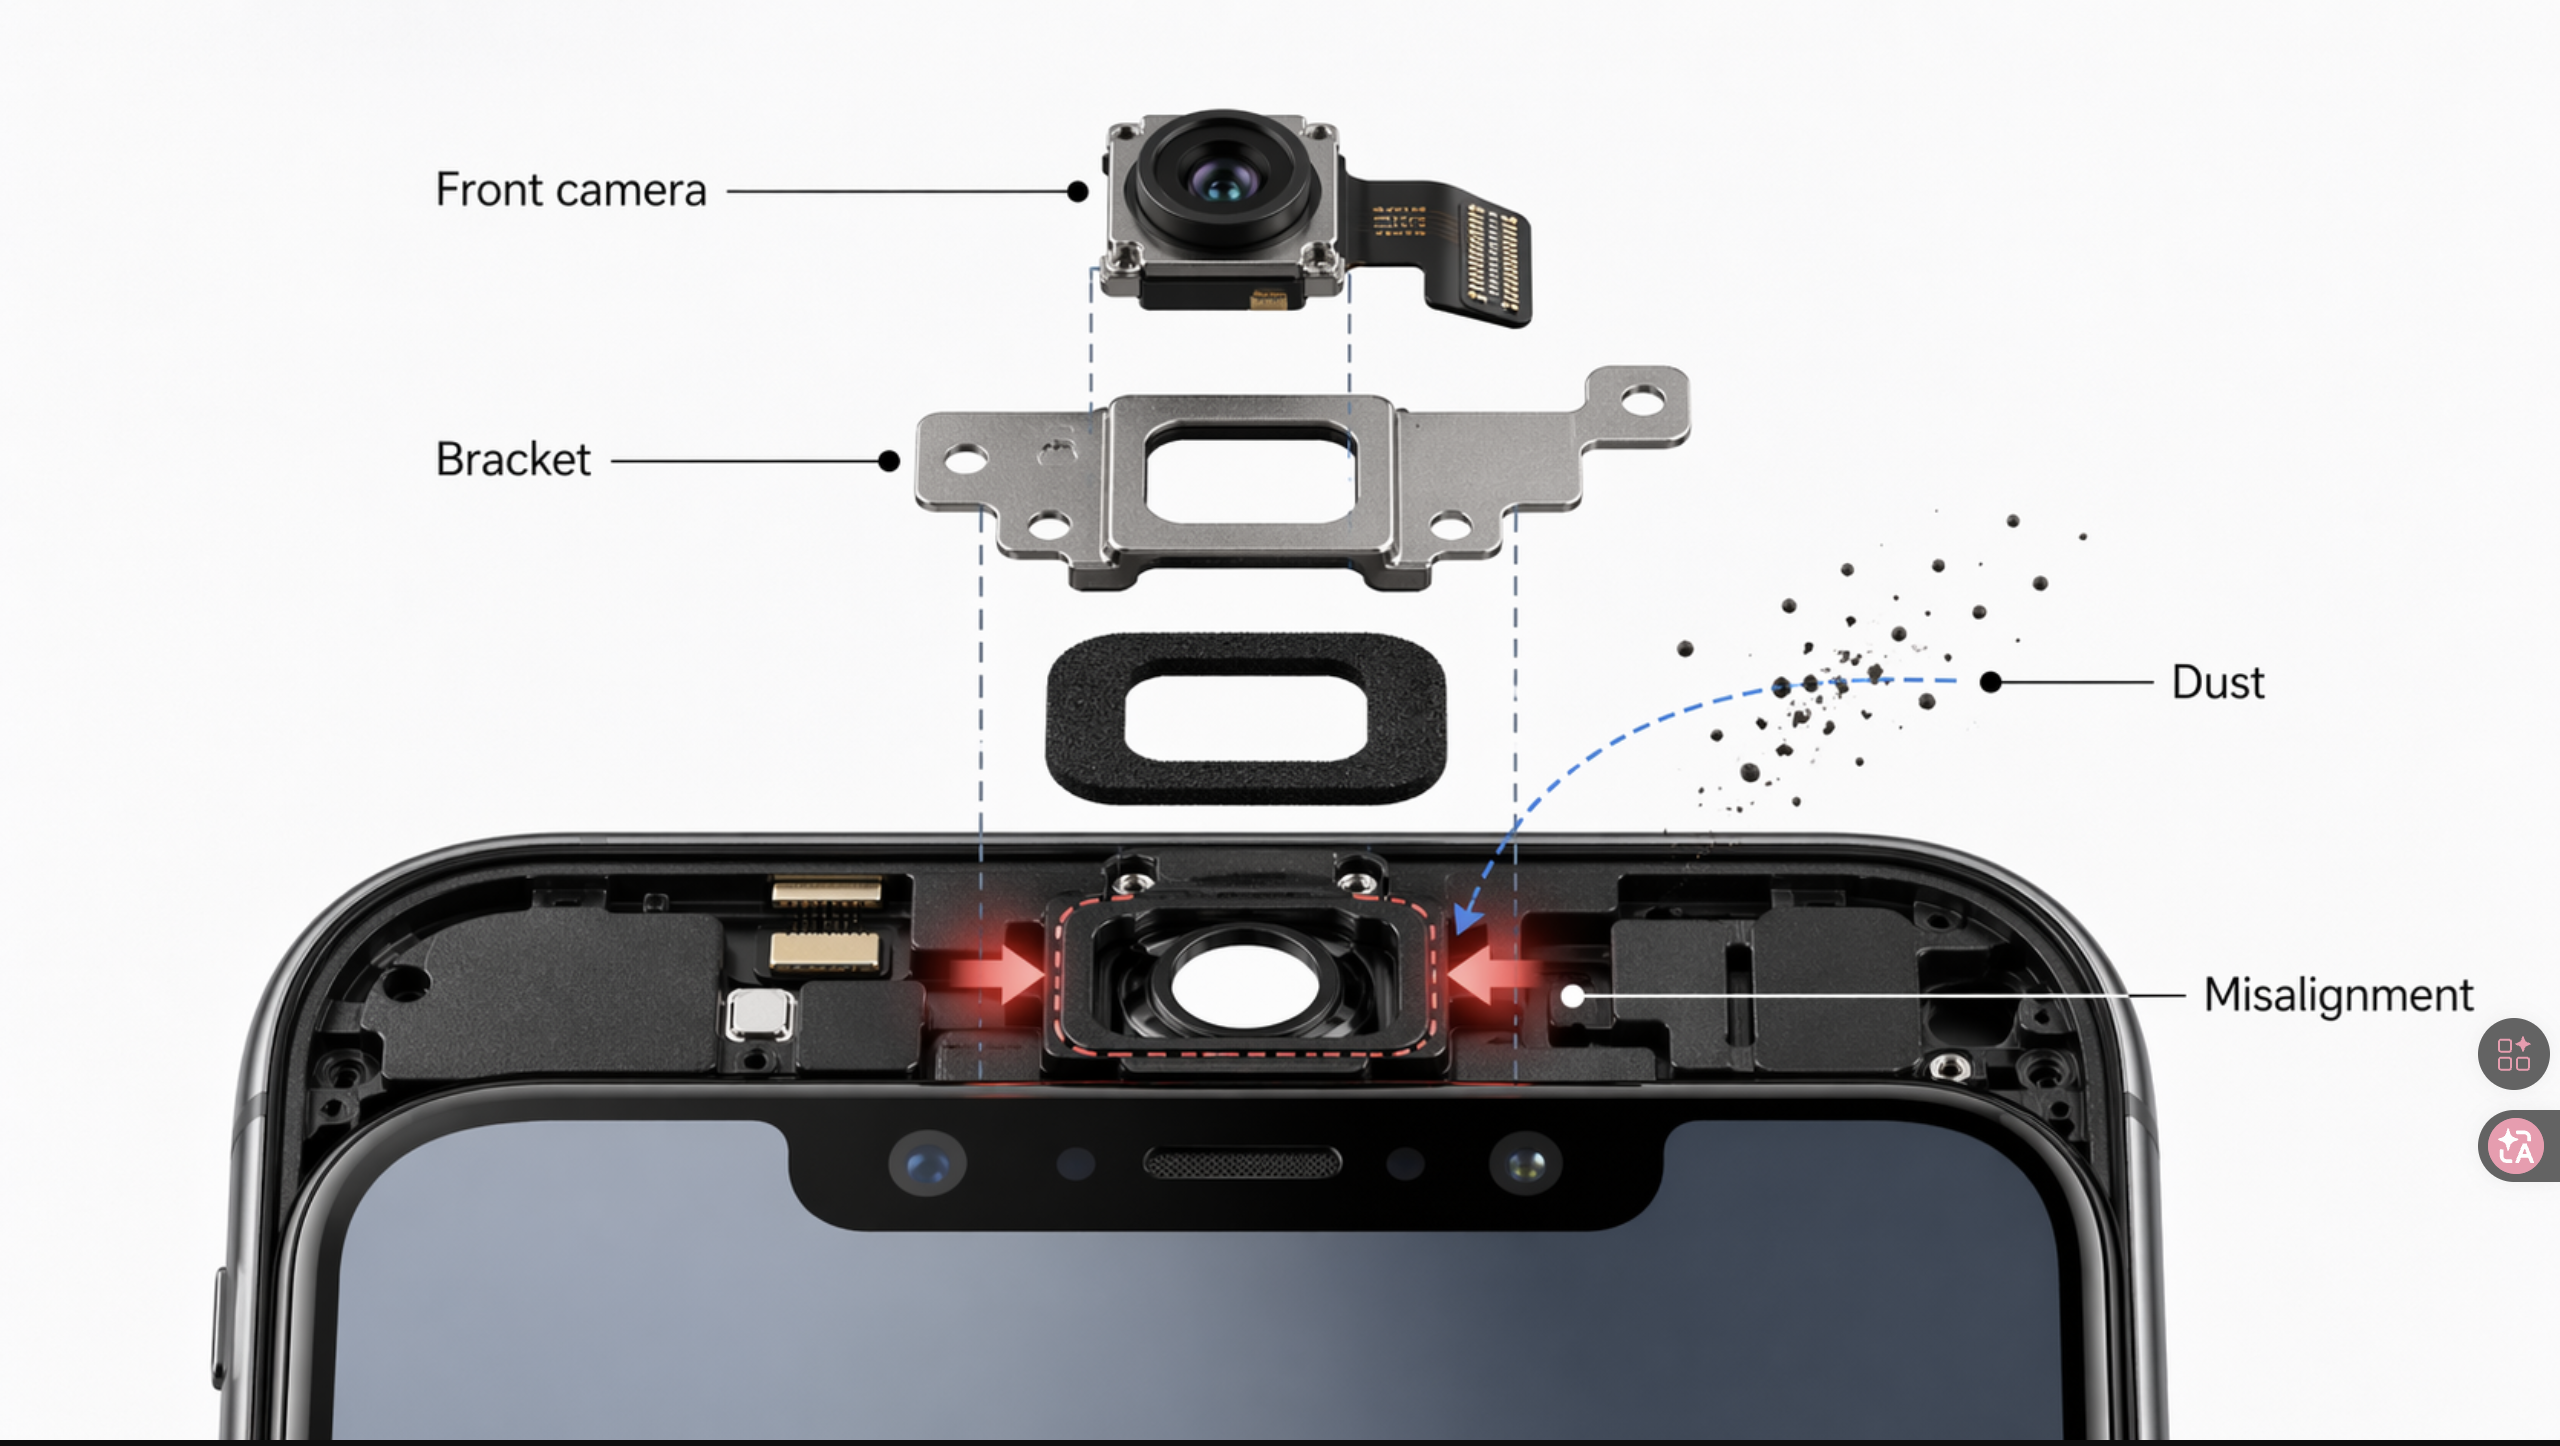
The earpiece flex assembly on iPhones (especially iPhone X and later) carries the ALS (ambient light sensor) and IR blaster alongside the earpiece speaker. During screen replacement, this flex gets transferred from the old screen to the new one. The problem usually isn't the transfer itself — it's pre-existing corrosion underneath the ALS and IR blaster components that you didn't notice.
One highly-upvoted technician described the fix: "We use a pre-heater at work and tune it to work those components off then scrape and clean underneath then place back on the hot plate to set back into place."
Symptoms: True boot loop immediately after reassembly. Phone was working before screen replacement.
Diagnostic test: Disconnect the earpiece/proximity sensor flex entirely. Connect only the LCD. If the phone boots, the earpiece flex is your problem.
Fix options:
- Clean corrosion under ALS/IR blaster with isopropyl alcohol or ultrasonic cleaner
- Replace the earpiece flex assembly ($5–$15 wholesale)
- For microscope-equipped shops: inspect for hairline tears in the flex and solder repair with 0.25mm wire
⚠️ Face ID warning: On iPhone X and later, the earpiece/front sensor assembly contains the flood illuminator, which is factory-paired to the logic board. Replacing the entire assembly (rather than cleaning/repairing it) will permanently disable Face ID on most models. Always attempt cleaning or micro-repair first to preserve Face ID functionality.
Models most affected: iPhone X, XS, XR, 11, 11 Pro — the earpiece flex design on these models is particularly fragile.
Cause #2: Front Camera / Face ID Flex Failure
The front camera flex assembly is the second most common boot loop trigger. On iPhone X and later, the Face ID system is split across two assemblies: the earpiece/front sensor assembly (which houses the flood illuminator) and the front camera flex (which carries the dot projector and infrared camera). Damage to either during screen replacement can cause a true boot loop or error 4013 during restore.
One technician reported: "4013 is typically caused by a failed Face ID related component in the display. Disconnecting the earpiece flex will allow you to continue to use the phone."
Note on error 4013: Apple classifies errors 9, 4005, 4013, and 4014 as generic communication failures. Before assuming hardware, first try a different USB cable, a different USB port, and a different computer. If 4013 persists after ruling out connection issues, then check the Face ID flex assembly.
Another technician described saving Face ID through microscope inspection: "Check the Face ID with a microscope, see if it has any tear, if it's one or two lines, you can solder it with a thin wire."
Symptoms: Boot loop or error 4013. Face ID stops working even after boot is restored.
Diagnostic test: Disconnect the front camera flex, leaving only the LCD and earpiece connected. If the phone boots, the front camera flex is the culprit.
Fix options:
- Replace front camera flex assembly (preserves selfie camera but loses Face ID on most models)
- Microscope-level flex repair to retain Face ID (requires microsoldering skill)
- Use ultrasonic cleaning if corrosion is the root cause
Important note on Repair Assistant and Face ID: Apple's Repair Assistant (iOS 18+) can calibrate replacement parts, but the scope varies significantly by model:
- iPhone 12–13 series: Repair Assistant can complete display and battery calibration. Front camera/Face ID calibration is limited — replacing the front camera assembly typically still disables Face ID.
- iPhone 14–15 series: Repair Assistant supports display, battery, rear camera, and back glass calibration. A replaced front camera won't function until the repair is completed through Repair Assistant or the phone is restored.
- iPhone 16+: Apple introduced same-model used front camera reuse — you can transfer a genuine front camera from another iPhone 16 and Repair Assistant will calibrate it, preserving Face ID.
In all cases, the replacement part must not have Activation Lock enabled, and the phone needs Wi-Fi, latest iOS, and 20%+ battery.
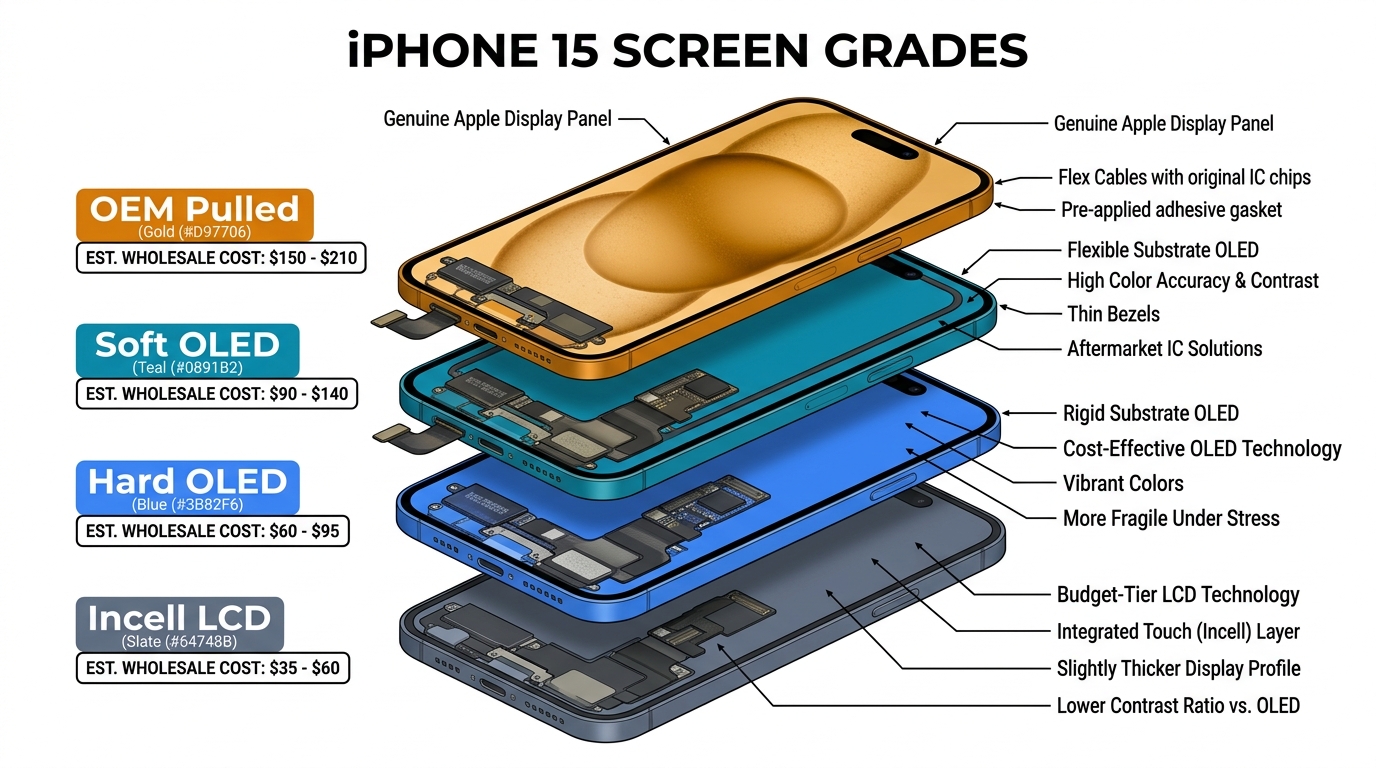
Cause #3: Faulty Aftermarket Screen or IC Incompatibility
Starting with iPhone 11, Apple began tracking display part history — each screen's IC chip communicates identification data to the logic board. iPhone 12 expanded this with stricter serialization checks. This has led to confusion in the repair community about whether serialization itself causes boot loops.
Here's the reality: Apple's own documentation states that the "Unable to verify genuine Apple display" warning does not affect your ability to use the phone. The warning message alone won't cause a boot loop.
What does cause boot loops is a physically faulty or incompatible IC chip on the aftermarket screen. Low-quality screens with defective ICs, incorrect data lines, or IC chips that aren't compatible with the installed iOS version can fail the hardware handshake and trigger a restart loop. One repair shop owner traced repeated blue screens and boot loops to a bad batch from a new supplier: "We were trying out a new supplier. Looks like we're no longer using them."
Symptoms: Boot loop that only occurs with the new screen. Original screen (if available) boots fine.
Diagnostic test: Try a known-good screen. If the phone boots with a different screen, the replacement screen's IC is the issue.
Fix options:
- Transfer the original screen's IC chip to the new screen (requires "IC Swappable" screen design)
- Use an EEPROM programmer (JC V1S or QianLi iCopy, $100–$250) to write the original screen data to the new IC
- Source screens specifically labeled "IC Swappable" — suppliers like Injured Gadgets (FX5 line) and REWA Technology (REPART line) design screens with removable IC chips for this purpose
- Update the phone to the latest iOS before installing the new screen — some aftermarket ICs only work with newer firmware
ROI note: An EEPROM programmer at $100–$300 pays for itself in 2–5 repairs by eliminating screen-related boot loop callbacks.
Cause #4: Improperly Seated Display Connector
This is the most embarrassing cause on the list — and one of the most common simple fixes. The display connector sits just slightly off, making partial contact. The phone might boot once, then loop the next time. Or it might work on the bench but fail when the customer puts a case on and applies pressure.
As one tech described it: the connector can be "off by a hair" and still appear visually seated.
Symptoms: Intermittent boot loop. Phone sometimes boots, sometimes doesn't. Display may flicker or show artifacts before looping.
Diagnostic test: Open the phone, disconnect and firmly reseat the display connector. Use magnification (loupe or microscope) to verify all pins are aligned and the connector is fully clicked.
Fix: Reseat the connector properly. Check for bent pins or debris in the connector. If the connector or socket shows physical damage, the display cable or logic board connector may need repair.
Prevention: Always use magnification when seating display connectors. A $15 jeweler's loupe catches problems that bare eyes miss.
Cause #5: Long Screw Damage
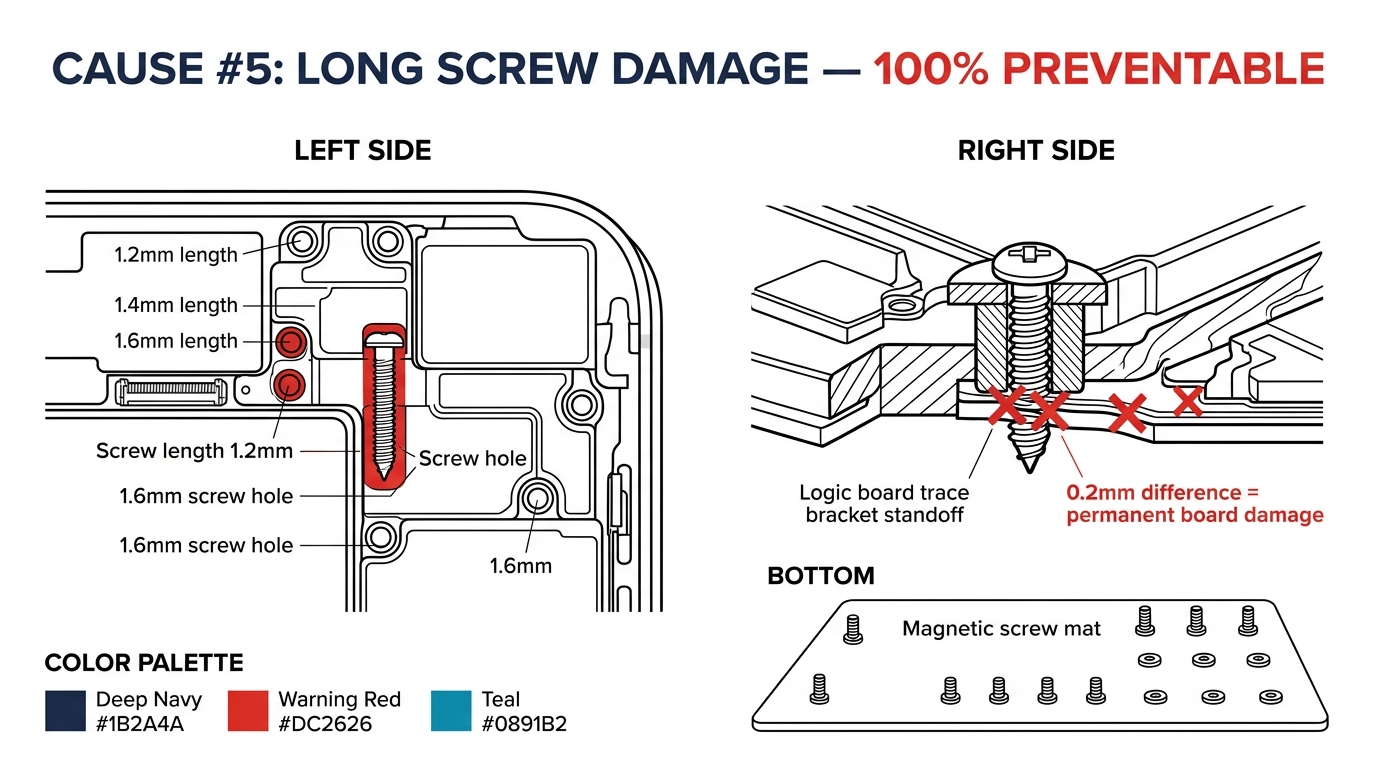
This is the cause every technician dreads because it's often permanent. "Long screw damage" happens when a longer screw from one location gets placed in a shorter screw hole during reassembly. The screw penetrates through the standoff and damages logic board traces underneath.
The damage isn't always visible. The screw might only crack a trace by microns — enough to cause intermittent connectivity failures that trigger boot loops under thermal expansion.
Symptoms: Boot loop that appears after reassembly. May be intermittent (works cold, fails warm). Can cause seemingly unrelated failures (Wi-Fi, cellular, backlight).
Diagnostic test: This is difficult to diagnose without board-level inspection. If all flex cables test clean and the boot loop persists, long screw damage should be suspected. A microscope inspection of the screw standoff areas near the display connector bracket is the next step.
Fix: Board-level microsoldering to repair damaged traces. In many cases, the damage is severe enough that the phone is considered unrepairable at the shop level.
Prevention: This one is 100% preventable:
- Use a magnetic screw mat or labeled diagram during disassembly
- Photograph the screws in position before removal
- Never mix screws between positions — even screws that look identical can differ by 0.2mm
Cause #6: Battery or Power Delivery Failure
Battery-related boot loops after screen replacement typically come from one of three scenarios.
Scenario 1: Disconnection order error. If you disconnected the display before disconnecting the battery, you may have created a short that damaged the battery connector pins or the power management IC. Always disconnect the battery first.
Scenario 2: Aftermarket battery failure. If you replaced the battery alongside the screen, a faulty aftermarket battery can cause boot loops. One r/mobilerepair thread documented a swollen aftermarket battery causing overheating and board damage.
Scenario 3: Battery data pin damage. On iPhone 11 and later, the battery communicates health data to the logic board via data pins. Physical damage to these pins during disassembly can generate tgob/tgov panic codes visible in the phone's diagnostic logs.
Symptoms: Boot loop especially when plugged into power. Phone may boot briefly on battery alone but loop when charging. Panic logs (Settings > Privacy > Analytics > "panic-full" files) show tgob or tgov codes.
Diagnostic test: Try a known-good battery. Check panic logs for battery-specific codes. If the phone only loops while charging but works unplugged, suspect the charging circuit rather than the battery.
Note: Apple's "Unknown Part" warning for non-original batteries does not prevent the phone from booting — it only disables battery health reporting. If you see a boot loop with a new battery, the battery itself is physically defective or the data pins are damaged.
All 6 Causes at a Glance
| Cause | Fault Type | Models Most Affected | Fix Difficulty | Part Cost |
|---|---|---|---|---|
| #1 Earpiece/proximity flex | True boot loop | iPhone X–11 Pro | Easy | $5–$15 |
| #2 Front camera/Face ID flex | Boot loop or 4013 | iPhone X+ | Medium | $10–$25 |
| #3 Faulty aftermarket screen IC | True boot loop | iPhone 12+ | Medium (needs EEPROM tool) | $100–$250 (tool) |
| #4 Unseated display connector | Intermittent loop | All models | Easy (reseat) | Free |
| #5 Long screw damage | Intermittent/permanent | All models | Hard (board-level) | $150–$400 (repair) |
| #6 Battery/power failure | Panic restart | iPhone 11+ | Easy–Medium | $8–$20 |
How to Diagnose an iPhone Boot Loop After Screen Replacement
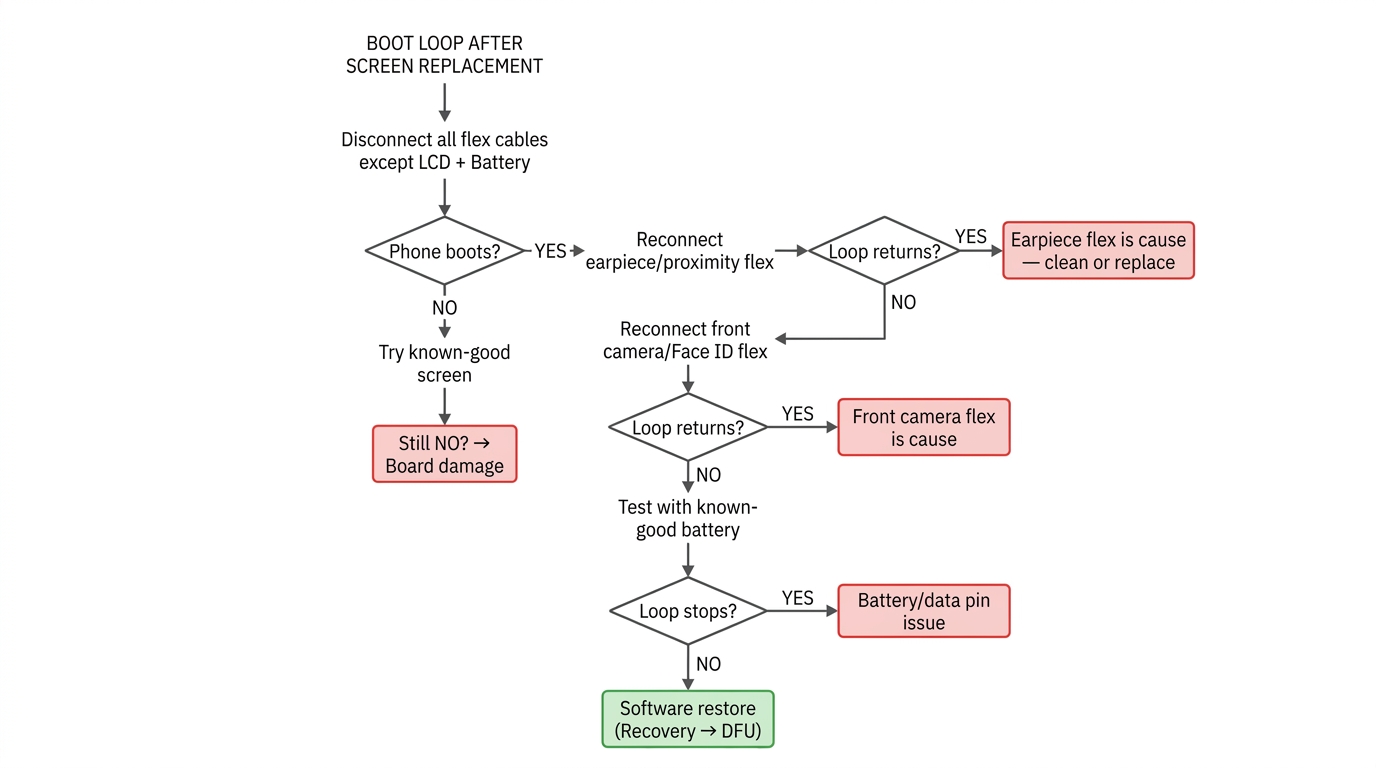
When a phone comes back boot looping after screen replacement, resist the urge to start swapping parts. Follow this systematic isolation method used by professional board-level repair shops:
Step 1: Disconnect the earpiece/proximity sensor flex, front camera/Face ID flex, and home button flex (if applicable). Leave the battery and LCD connected — the phone needs power to boot. Plug in the Lightning/USB-C cable if the battery is dead.
- Phone boots with only LCD + battery? → One of the disconnected flex cables is the cause. Proceed to Step 2.
- Still looping? → The LCD itself is faulty, the display connector is damaged, or there's long screw/board damage. Try a known-good screen. If it still loops with a known-good screen, suspect board-level damage.
Step 2: Reconnect the earpiece/proximity sensor flex.
- Boot loop returns? → Earpiece/proximity flex is the cause. Clean or replace.
- Still boots? → Proceed to Step 3.
Step 3: Reconnect the front camera/Face ID flex.
- Boot loop returns? → Front camera/Face ID flex is the cause. Inspect under microscope.
- Still boots? → Proceed to Step 4.
Step 4 (iPhone 7/8/SE only): Reconnect the home button flex. Skip this step on Face ID models.
- Boot loop returns? → Home button flex fault. Note: this isn't one of the 6 main causes above because it's model-specific to older Touch ID phones, but it follows the same isolation logic.
- Still boots? → Proceed to Step 5.
Step 5: If all flex cables pass but you suspect the battery, swap in a known-good battery. Check panic logs for tgob/tgov codes that indicate battery data pin damage.
- Boot loop stops with new battery? → Original battery or its data pin is the issue.
- Still looping? → All peripheral hardware tests clean. Move to Step 6.
Step 6 (software): Try a software restore. Force restart first (Volume Up → Volume Down → hold Side button 10+ seconds). If that fails, connect to a computer and try Recovery Mode, then DFU mode. Important: Try "Update" before "Restore" in Recovery Mode — Update preserves data while Restore erases everything. If DFU restore fails with error 4013, revisit hardware (see error 4013 note under Cause #2).
The entire isolation process takes 10–15 minutes with the phone open. It's faster than guessing and systematically eliminates each possible cause.
Reading Panic Logs
For 3-minute panic restarts specifically, panic logs are your best diagnostic tool. Go to Settings > Privacy & Security > Analytics & Improvements > Analytics Data and look for files starting with "panic-full." These logs show which hardware subsystem crashed. Tools like the GitHub-hosted Panic Log Analyzer by Wayne Bonicci can parse these automatically, though the results are suggestions rather than definitive answers.
When the Boot Loop Isn't Your Fault
Not every boot loop after screen replacement was caused by the screen replacement. This matters for your shop's reputation and your customer conversations.
iOS updates. In 2026, iOS 26 caused boot loops on factory-sealed, never-repaired iPhone 16 and 16 Pro Max devices. One user reported getting a third replacement phone because each one boot looped after the same update. If your customer updated iOS around the same time as the screen replacement, the software may be the real cause.
Pre-existing manufacturing defects. The iPhone 7 has a well-documented "loop disease" — a manufacturing defect in the audio IC solder joints that causes boot loops completely unrelated to screen repair. iPad 6th and 7th generation have similar CPU solder defects. A brand-new iPhone 17 Pro Max was reported boot looping after one week with zero repair history, with panic logs pointing to a display controller failure.
Coincidental timing. One shop owner proved a replacement screen was functional by testing it in his own phone — yet Apple told the customer he "should stop doing iPhone repairs."
How to protect your shop:
- Document the phone's condition before and after repair (photos or short video)
- Run a full boot test and Face ID test before returning the device
- Keep records of which parts were installed (part number, supplier, batch)
- Inform customers that boot loops can occur from software updates or pre-existing issues regardless of repair quality
Prevention Checklist
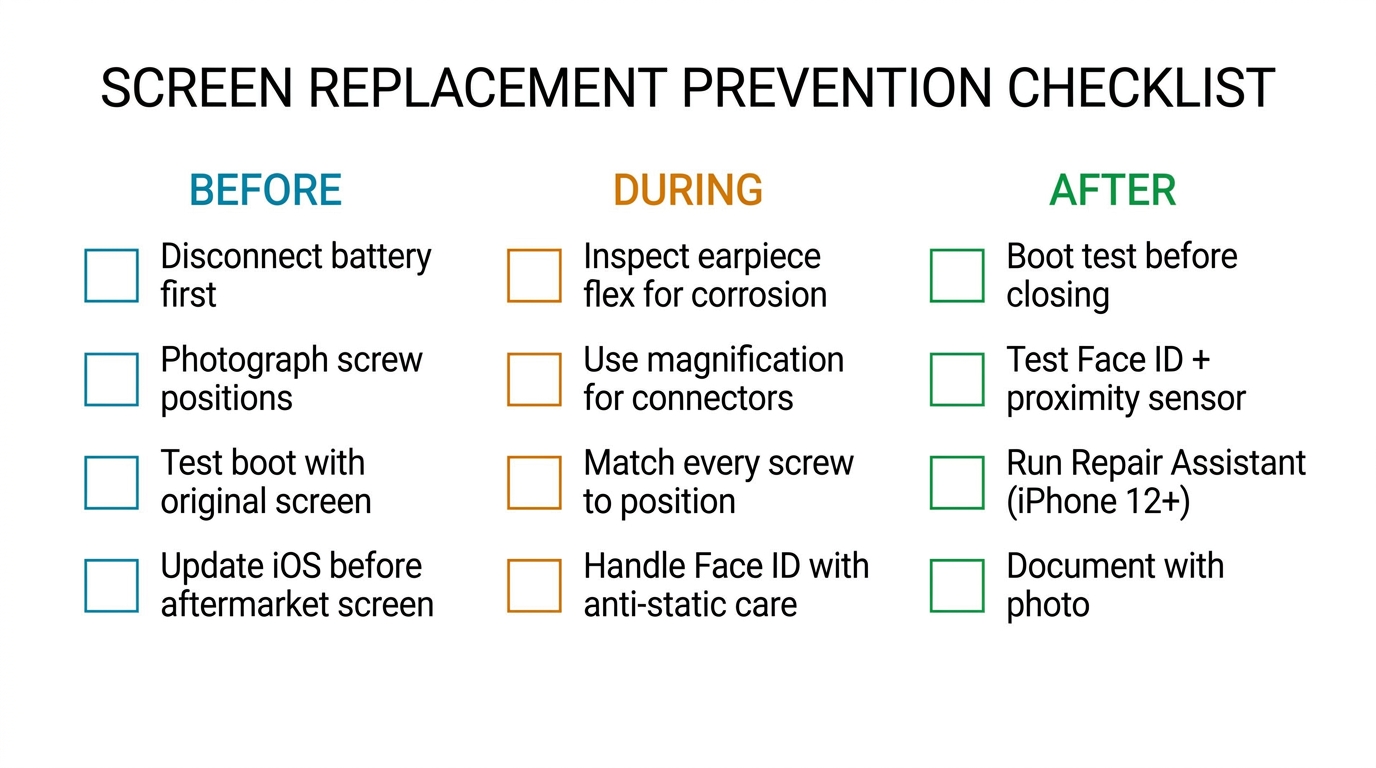
Print this and tape it to your workstation. Following it on every screen replacement eliminates the preventable causes.
Before disassembly:
- Disconnect battery before display
- Photograph screw positions or use labeled magnetic mat
- Test that the phone boots normally with the original screen
- Note iOS version — update BEFORE replacement if using aftermarket screen
During replacement:
- Transfer earpiece/proximity components carefully; inspect for corrosion
- Never force flex connectors — use magnification to align
- Match every screw to its original position (prevent long screw damage)
- Handle Face ID components with anti-static precautions
After reassembly:
- Boot test before closing the phone
- Test Face ID, proximity sensor, ambient light sensor
- Run Repair Assistant calibration where supported (iPhone 12+ display/battery, iPhone 14+ back glass, iPhone 16+ front camera; requires iOS 18+, Wi-Fi, 20%+ battery)
- Document the completed repair with a photo of the boot screen
Frequently Asked Questions
Can a broken screen cause an iPhone boot loop?
Yes — but it's usually not the LCD panel itself. A damaged proximity sensor flex, corroded ALS/IR blaster, or faulty IC chip on the replacement screen can all fail the iPhone's POST hardware check and trigger a restart loop. The phone checks each component during startup, and if any handshake fails, it loops rather than booting with a faulty sensor.
How much does it cost to fix an iPhone boot loop?
It depends on the cause. Software-only fixes (force restart, DFU restore) cost nothing. Flex cable replacements run $5–$15 for the part plus labor — most independent shops charge $50–$150 total. Apple doesn't offer a specific "boot loop repair" — they charge for the component they replace. An out-of-warranty screen replacement through Apple typically runs $199–$379 depending on model; if they determine the device needs a full-unit replacement, costs can exceed $500. Independent board-level microsoldering typically costs $150–$400.
Does factory reset fix a boot loop?
A factory reset through DFU mode can fix boot loops caused by software corruption. However, if the boot loop started immediately after a screen replacement, the cause is almost always hardware — a damaged flex cable, faulty screen IC, or connector issue. In that scenario, no amount of software restoration will help. Try the hardware isolation test described above first. Software fixes (Recovery Mode, DFU restore) are more relevant when the boot loop appeared after an iOS update or without any recent repair.
What is the "Unknown Part" warning after screen replacement?
Starting with iPhone 11, Apple displays a Parts and Service History notification in Settings if a non-original display is detected. Apple's documentation confirms this notification does not prevent you from using the phone — it's informational only. The boot loop risk comes from physically faulty aftermarket IC chips or damaged data lines, not from the notification itself. Using screens with transferable IC chips or an EEPROM programmer addresses the hardware compatibility issue. Note that Apple's system distinguishes between genuine, used genuine, and non-genuine parts — an EEPROM programmer restores True Tone and screen data but won't make a third-party screen register as "genuine" in Apple's diagnostics.
How do I read iPhone panic logs to diagnose boot loops?
Go to Settings > Privacy & Security > Analytics & Improvements > Analytics Data and look for files starting with "panic-full." These logs record which hardware subsystem caused the crash. Common boot-loop-related codes include tgob/tgov (battery data pin issues) and i2C bus stalls (sensor communication failures). Free tools like the Panic Log Analyzer on GitHub can help parse these, though they provide suggestions rather than definitive diagnoses.
Next Steps
The six causes above account for the vast majority of iPhone boot loops after screen replacement. The diagnostic flowchart narrows it down in 15 minutes. The prevention checklist keeps it from happening in the first place.
If you're sourcing replacement screens, proximity sensor flex cables, or EEPROM programmers for your shop, browse the wholesale iPhone & Samsung screen catalog or request a wholesale quote from PRSPARES. We stock IC Swappable screen assemblies (Soft OLED, Hard OLED, and Incell) for iPhone 7 through iPhone 16 Pro Max, along with earpiece flex assemblies, front camera modules, and JC/QianLi EEPROM programming tools — all at wholesale pricing with lifetime warranty.
The right parts don't just save money on the purchase — they eliminate the callbacks that cost you time and reputation.