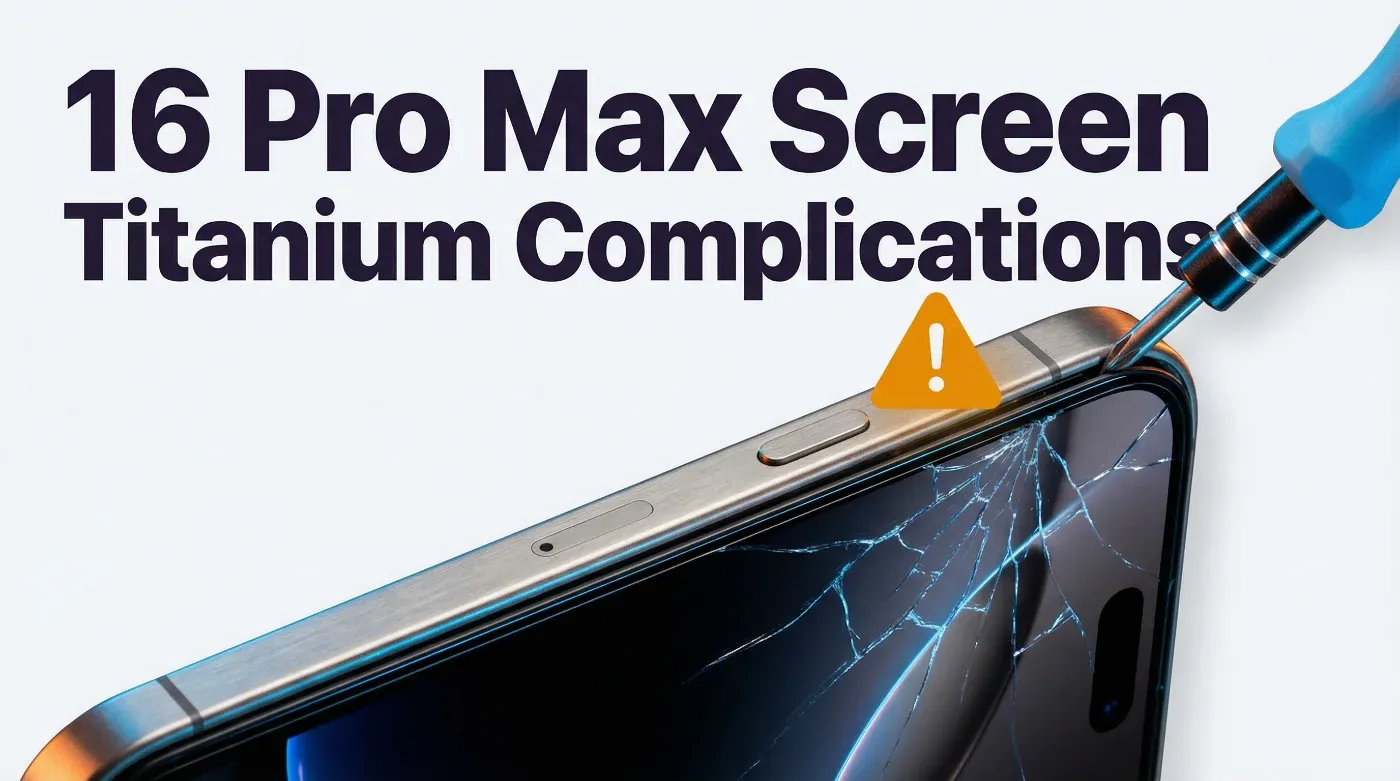
The iPhone 16 Pro Max is Apple's most repairable flagship in years — Apple said so themselves when they introduced the new back glass design. But the screen is a different story.
The titanium frame, the Camera Control button, and the new display connector routing make the iPhone 16 Pro Max screen replacement significantly more complex than the 15 Pro Max. Repair shops that approach it like a standard iPhone screen swap are seeing secondary damage rates of 15-20% on their first attempts.
This guide covers everything specific to the 16 Pro Max: the complications, the correct procedure, the parts landscape, and the UK pricing.
What Makes the iPhone 16 Pro Max Screen Replacement Different
Before getting into the procedure, you need to understand three things that are unique to this model.
1. The Titanium Frame Changes the Adhesive Profile
The iPhone 15 Pro Max introduced titanium, but the 16 Pro Max uses a different adhesive formulation around the display perimeter. The adhesive is stronger and more heat-resistant than previous models — Apple designed it to reduce display separation in high-temperature environments.
The practical implication: The standard 80°C iOpener or heat gun approach that works on iPhone 14 and 15 models is insufficient. You need to reach 90-95°C consistently around the full perimeter, and you need to hold that temperature for longer. Rushing the heating phase is the primary cause of cracked replacement screens during installation.
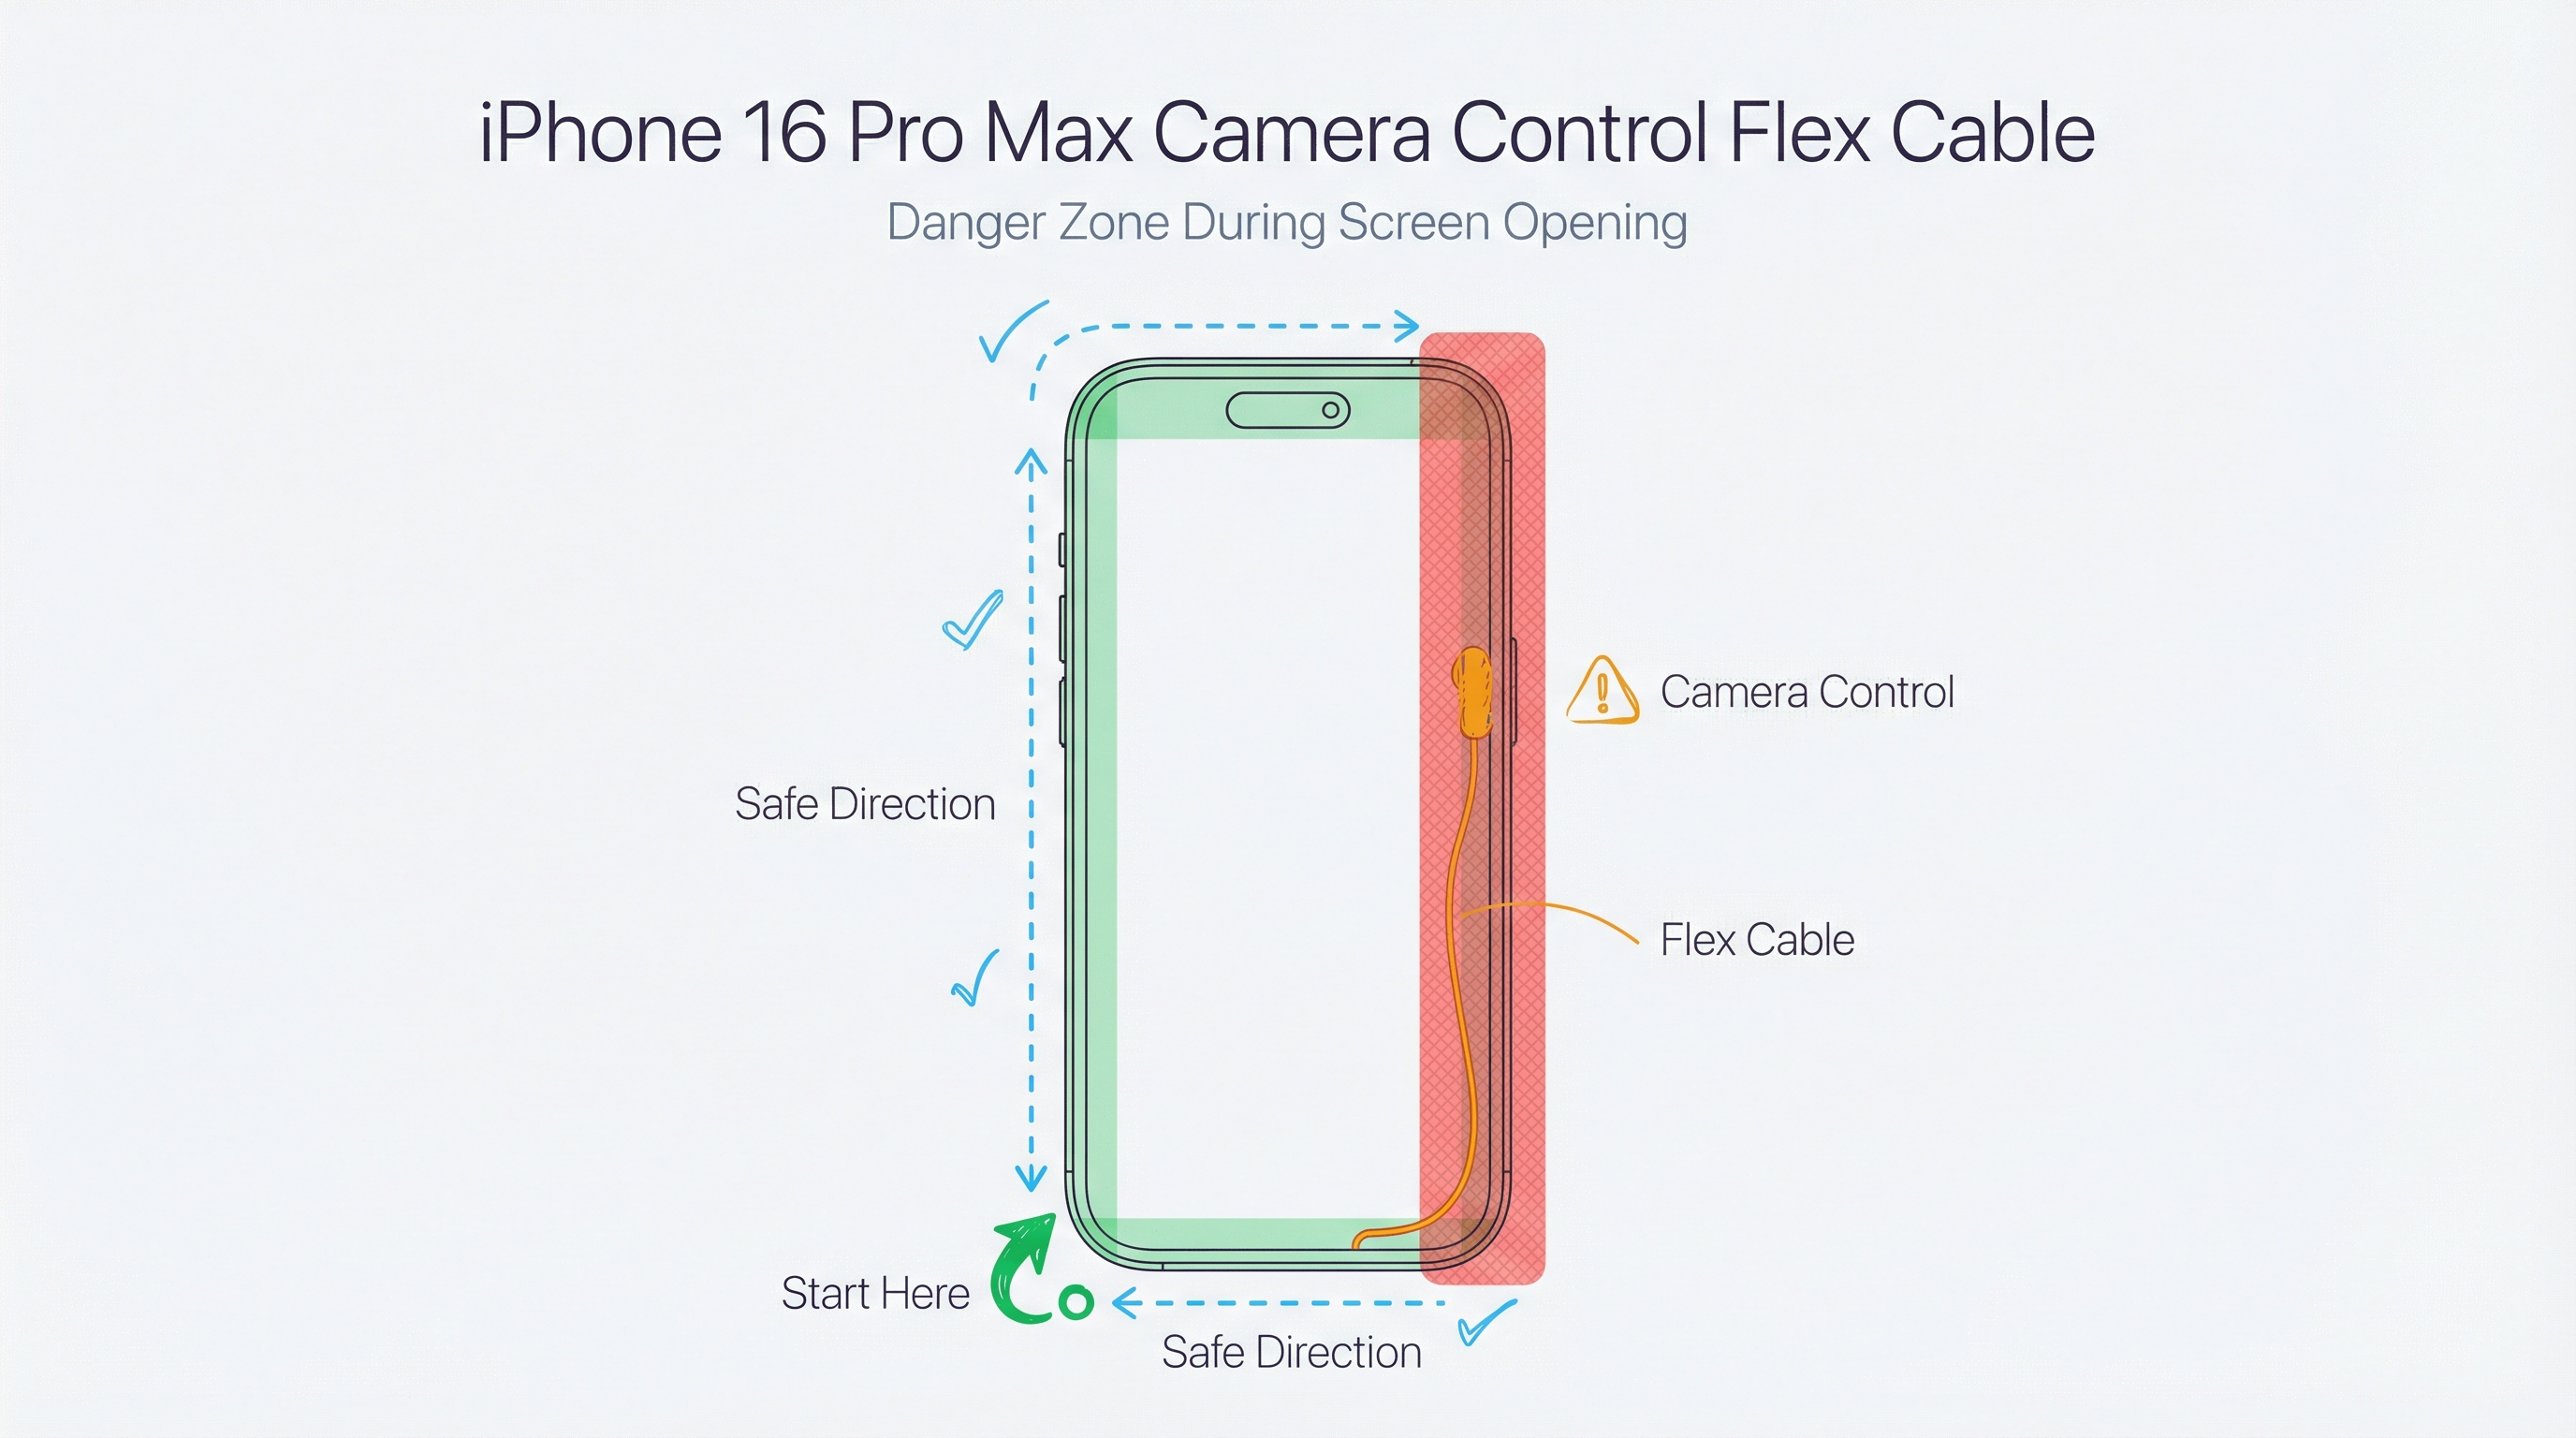
2. The Camera Control Button Has a Flex Cable That Routes Under the Display
The Camera Control button (the new capacitive button on the right side) has a flex cable that routes partially under the display assembly. This cable is not connected to the screen itself, but it runs close enough to the display adhesive that aggressive prying near the right side of the phone can sever it.
The practical implication: When separating the display, work from the bottom-left corner and move clockwise. Do not start prying from the right side. A severed Camera Control flex cable is a £45-£80 part that requires removing the display again to replace.
3. The Display Connector Is Recessed Deeper Than Previous Models
Apple moved the display connector approximately 2mm deeper into the chassis on the 16 Pro Max compared to the 15 Pro Max. This affects the angle required to disconnect and reconnect the display cable.
The practical implication: Standard iPhone display connector tools may not reach the connector at the correct angle. You need a connector pry tool with a thinner profile, or you risk damaging the connector housing. A damaged display connector on the logic board is a board-level repair — not something you want to cause during a screen swap.

Sourcing Replacement Screens in Bulk?
Incell / Hard OLED / Soft OLED grades — wholesale pricing, grade comparison on request.
Get Wholesale QuoteiPhone 16 Pro Max Screen Replacement: Step-by-Step
Tools Required
- Pentalobe P2 screwdriver (bottom screws)
- Tri-point Y000 screwdriver (internal screws)
- Phillips #000 screwdriver (battery connector bracket)
- iOpener or heat gun (capable of sustained 90-95°C)
- Suction cup (strong — the titanium frame requires more force)
- Plastic opening picks (minimum 4)
- Thin display connector pry tool
- Anti-static mat and wrist strap
- Replacement screen (Grade A OLED recommended)
- New display adhesive strips (pre-cut for 16 Pro Max)
Time required: 45-60 minutes for experienced technicians. 90-120 minutes for first-time 16 Pro Max repairs.
Step 1: Power Down and Remove SIM
Power off the iPhone completely. Remove the SIM tray using the SIM ejector tool. This prevents any electrical issues during the repair and gives you one less thing to damage.
Step 2: Remove the Two Bottom Pentalobe Screws
The two screws flanking the Lightning port are Pentalobe P2. Remove and store them separately — they're different lengths on some 16 Pro Max units (check before reassembly).
Step 3: Heat the Display Perimeter
This is the most critical step. Apply heat to the display perimeter for 3-4 minutes, moving the heat source continuously. Target temperature: 90-95°C at the glass surface. Use an infrared thermometer to verify — guessing the temperature is how screens crack.
Pay particular attention to the corners, which retain heat less effectively than the straight edges. Do two full passes around the perimeter before attempting to open.
Step 4: Apply Suction and Create Initial Gap
Place the suction cup on the lower portion of the display, avoiding the camera area. Apply firm, steady upward pressure while simultaneously inserting a thin plastic pick into the gap at the bottom-left corner.
Do not use metal picks. The titanium frame is harder than aluminium but the display gasket is still vulnerable to metal tools. A metal pick that slips will scratch the titanium and potentially damage the display cable.
Once you have a 2-3mm gap at the bottom-left, insert a second pick to hold the gap open.
Step 5: Work Clockwise — Left Side, Top, Right Side Last
Move your opening pick slowly along the left side of the phone, then across the top. The adhesive on the left and top is typically easier to separate than the right side.
When you reach the right side: Slow down significantly. This is where the Camera Control flex cable runs close to the display adhesive. Use short, careful strokes with the pick rather than long sweeping motions. If you feel resistance that seems different from adhesive resistance, stop and reassess before continuing.
Step 6: Open the Display — Hinge at the Left Side
Once the adhesive is fully separated, open the display like a book, hinging from the left side. Do not open it more than 90 degrees. The display cable runs from the right side of the display to the connector on the logic board — opening past 90 degrees will stress this cable.
Prop the display open at approximately 70-80 degrees using a display stand or a folded cloth.
Step 7: Disconnect the Battery
Before touching the display connector, disconnect the battery. Remove the two Phillips screws from the battery connector bracket, remove the bracket, and disconnect the battery flex cable. This is non-negotiable — connecting or disconnecting display cables with the battery connected risks display damage and logic board damage.
Step 8: Remove the Display Connector Cover and Disconnect
The display connector is covered by a small metal bracket secured with two tri-point screws. Remove the screws and bracket.
Use your thin display connector pry tool at the correct angle — approximately 30-35 degrees from horizontal, approaching from the top of the connector. The 16 Pro Max connector is recessed deeper than previous models, so you need to reach further into the chassis than you're used to.
Disconnect the display cable with a smooth upward motion. Do not lever sideways.
Step 9: Remove the Old Display
The display is now free. Set it aside on your anti-static mat.
Step 10: Transfer Components (If Required)
If your replacement screen doesn't include the earpiece speaker assembly, you'll need to transfer it from the old display. This involves removing 4 screws and carefully peeling the earpiece mesh. Take care not to damage the mesh — replacement earpiece assemblies for the 16 Pro Max are £25-£40.
Step 11: Clean the Frame Adhesive Channel
Remove all old adhesive from the display channel using a plastic tool and isopropyl alcohol (90%+). The new adhesive strips will not bond properly over old adhesive residue, and poor adhesion is the primary cause of display separation failures after repair.
Step 12: Install New Adhesive Strips
Apply the pre-cut adhesive strips for the iPhone 16 Pro Max. Do not use generic adhesive strips — the 16 Pro Max has a specific adhesive profile that matches the titanium frame geometry. Generic strips leave gaps at the corners that allow moisture ingress.
Step 13: Connect the New Display
Connect the display cable to the logic board connector. You should feel a definite click. If you don't feel a click, the connector is not fully seated — do not proceed. A partially seated display connector causes intermittent display issues that are difficult to diagnose later.
Reinstall the connector bracket and screws.
Step 14: Reconnect the Battery and Test
Reconnect the battery and reinstall the battery connector bracket. Before sealing the display, power on the phone and test:
- Display brightness and colour uniformity
- Touch response across the full screen
- Face ID (should work immediately with a quality replacement screen)
- True Tone (will not work with aftermarket screens — this is normal)
- Camera Control button (test that it responds to touch and press)
- Earpiece speaker
If everything works, power off and proceed to sealing.
Step 15: Seal the Display
Remove the adhesive backing and carefully lower the display into the frame, starting from the top and working down. Apply firm, even pressure around the full perimeter for 60 seconds. Do not press on the centre of the display — press only on the edges where the adhesive is.
Reinstall the two Pentalobe screws at the bottom.
iPhone 16 Pro Max Screen Replacement Cost UK
| Repair Route | Price | Notes |
|---|---|---|
| Apple (with AppleCare+) | £25 | Best value if you have AppleCare+ |
| Apple (without AppleCare+) | £599 | Genuine Apple screen, full warranty |
| Independent repair shop | £180–£280 | Grade A OLED, 3-12 month warranty |
| DIY (Grade A parts) | £120–£160 | Parts only, no labour |
| DIY (budget parts) | £80–£110 | Parts only, lower quality |
The AppleCare+ calculation: AppleCare+ for iPhone 16 Pro Max costs £14.99/month or £249 upfront. If you're likely to crack the screen once in two years, the maths favours AppleCare+. If you've never cracked a screen, it's a harder call.
Parts Quality Guide for iPhone 16 Pro Max Screens
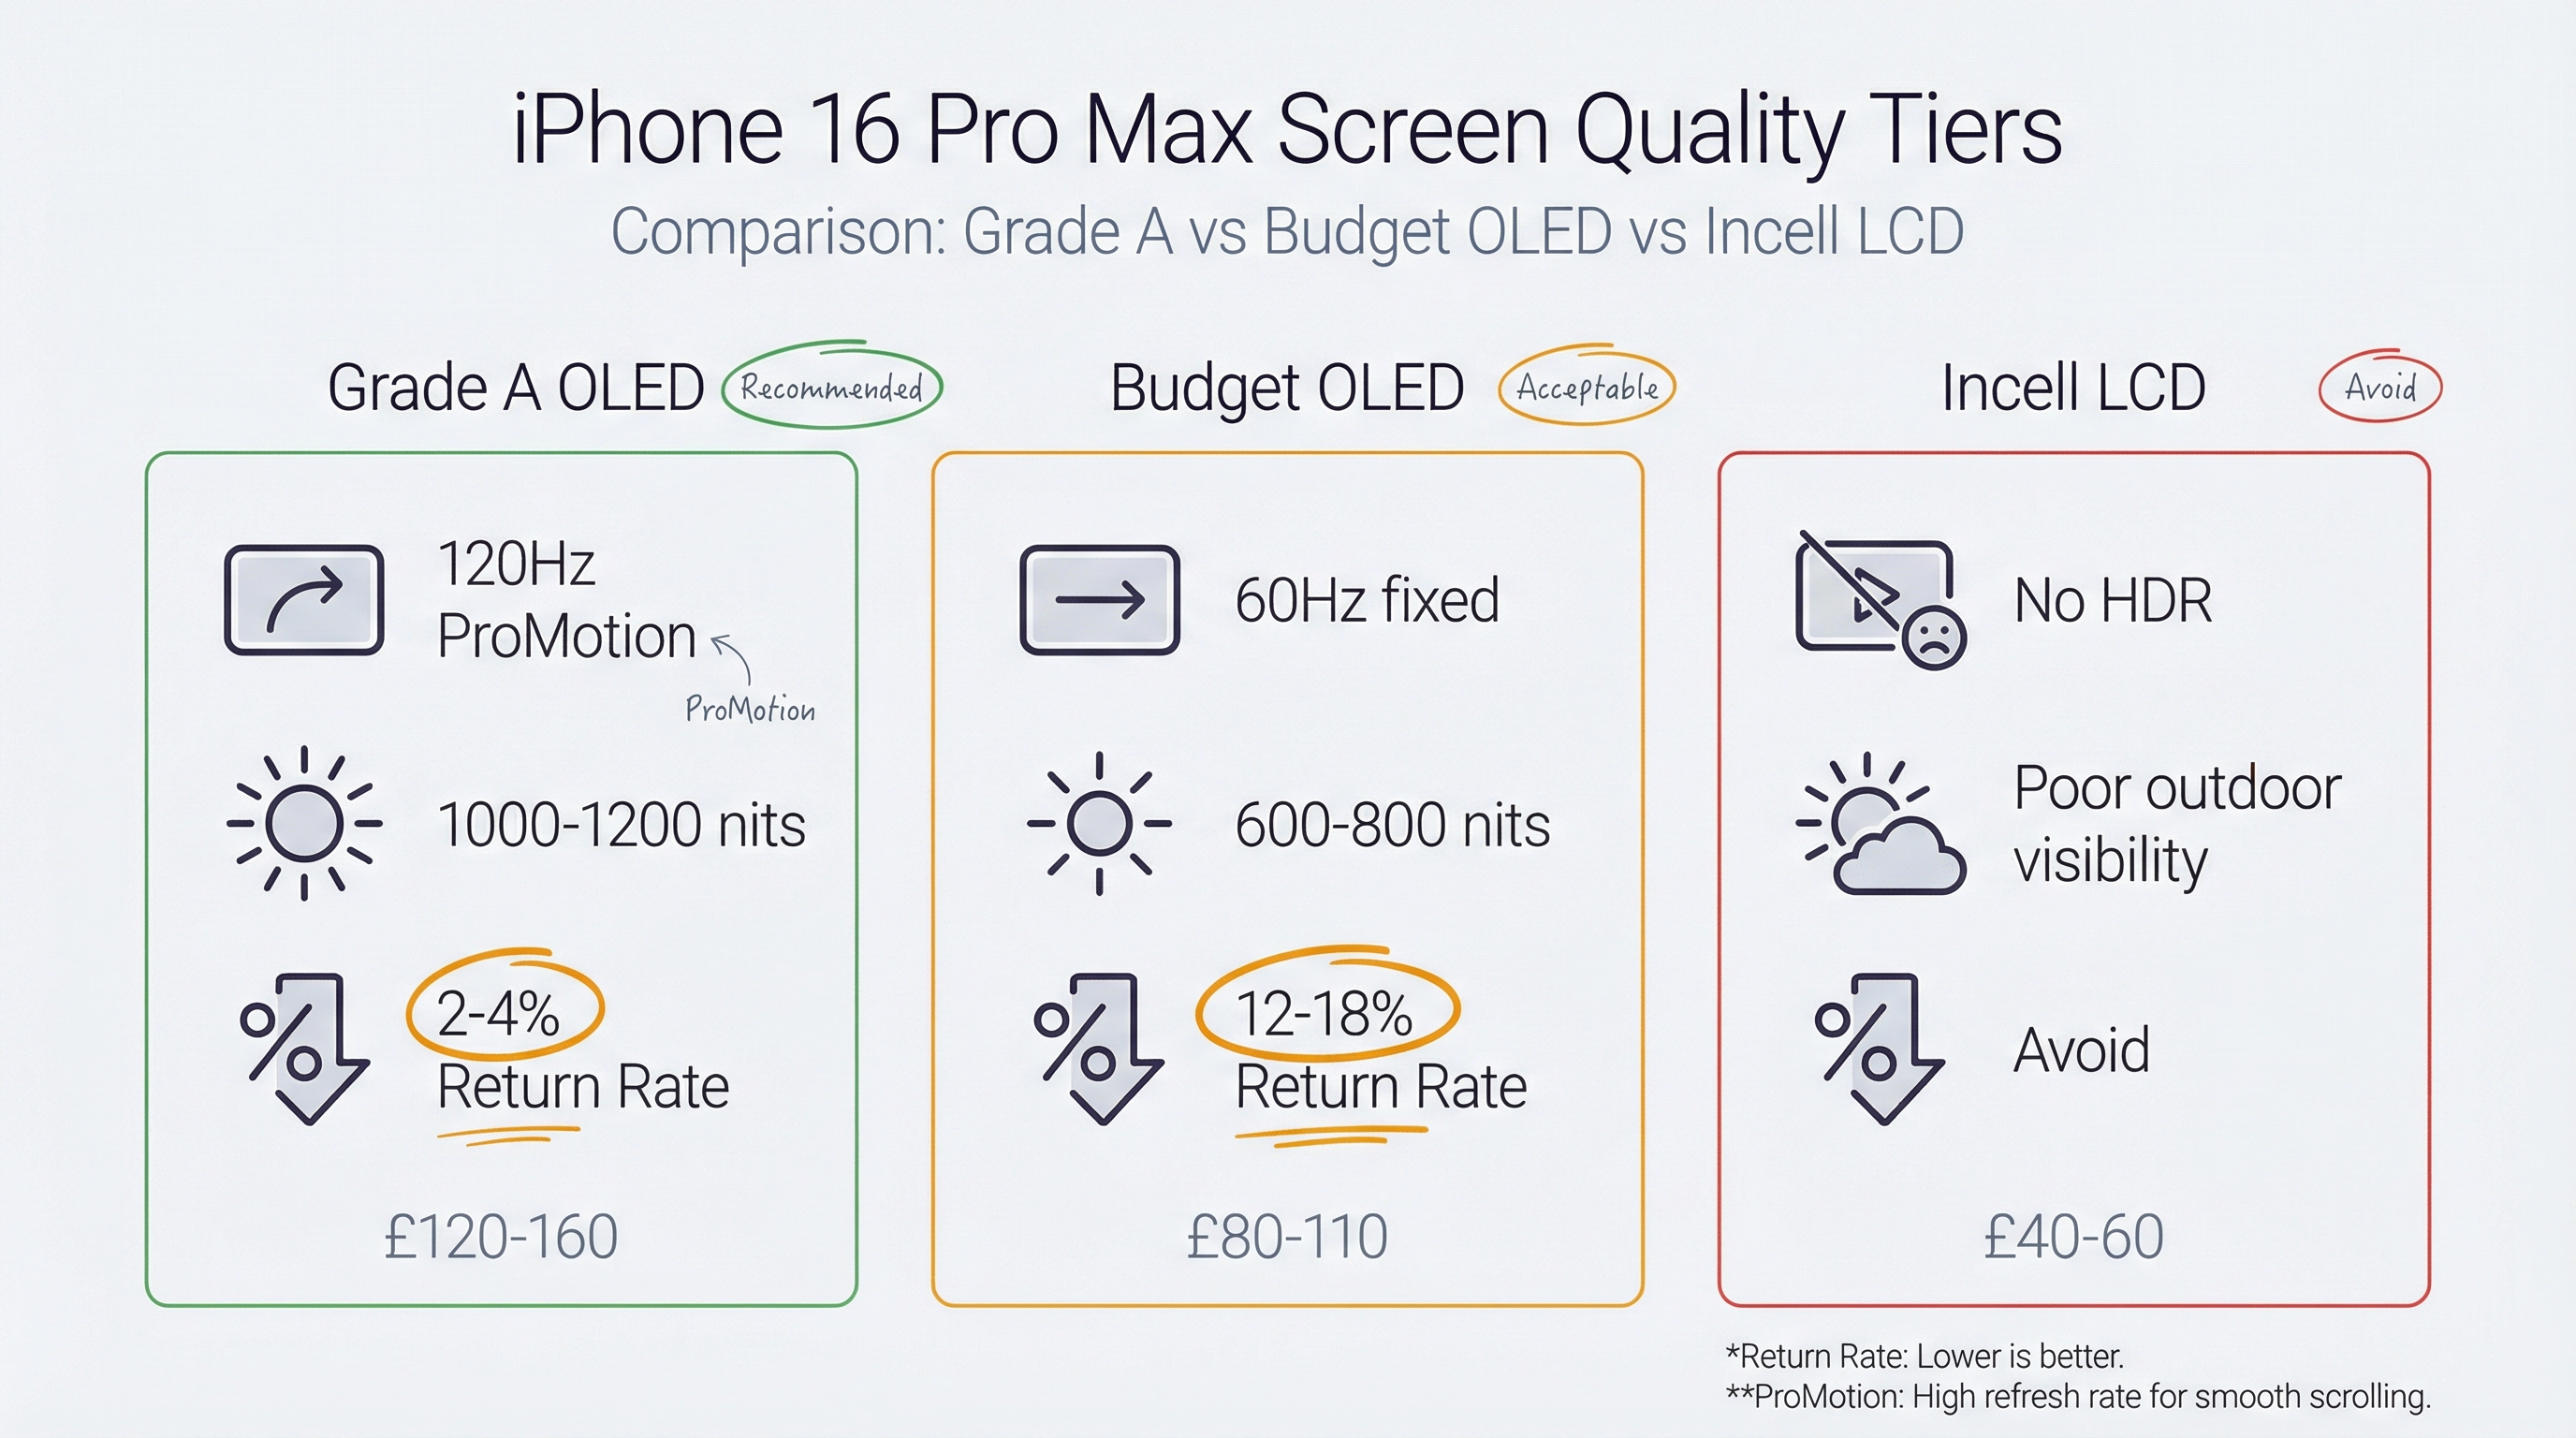
The iPhone 16 Pro Max uses a Super Retina XDR OLED display with ProMotion (1-120Hz adaptive refresh). Not all replacement screens support ProMotion.
Grade A OLED (Recommended)
- Full 120Hz ProMotion support
- Colour accuracy within 5% of original
- Brightness within 10% of original (typically 1000-1200 nits)
- True Tone: not supported (hardware limitation of aftermarket screens)
- Expected lifespan: 18-36 months with normal use
Budget OLED
- 60Hz fixed refresh rate (no ProMotion)
- Noticeable colour shift at angles
- Lower peak brightness (600-800 nits)
- True Tone: not supported
- Expected lifespan: 6-18 months
Incell LCD (Avoid)
The iPhone 16 Pro Max was never designed for LCD. Incell LCD replacements exist but they're significantly inferior — lower resolution, no HDR, poor outdoor visibility. Do not use these.
For repair shops: The difference in return rate between Grade A OLED and budget OLED on the 16 Pro Max is significant. Budget screens have a 12-18% return rate within 6 months. Grade A screens have a 2-4% return rate. At a typical repair price of £220, one warranty claim wipes out the margin savings from using cheaper parts on 3-4 repairs.
Common Issues After iPhone 16 Pro Max Screen Replacement
Face ID Not Working
Face ID failure after screen replacement is almost always caused by one of three things:
- The Face ID dot projector flex cable was damaged during opening (runs near the top of the display)
- The display connector is not fully seated
- The replacement screen has a defective proximity sensor
Test Face ID immediately after connecting the display and before sealing. If it fails, reseat the display connector first. If it still fails, check the dot projector cable.
Camera Control Button Unresponsive
If the Camera Control button doesn't respond after repair, the flex cable was likely damaged during opening. This requires reopening the phone and replacing the Camera Control flex cable — a separate repair.
Display Separation at Corners
Corner separation within 3 months of repair indicates insufficient adhesive or inadequate heating during installation. The fix is to reheat and reseal, or replace the adhesive strips entirely.
Yellow Tint or Colour Shift
A yellow tint immediately after installation is usually the adhesive curing — it typically resolves within 24-48 hours. A persistent colour shift indicates a lower-quality replacement screen.
FAQ
How much does iPhone 16 Pro Max screen replacement cost in the UK?
Apple charges £599 without AppleCare+ or £25 with AppleCare+. Independent repair shops charge £180-£280 depending on parts quality and location. DIY parts cost £80-£160 depending on quality.
Does iPhone 16 Pro Max screen replacement affect Face ID?
No — Face ID components are in the TrueDepth camera system at the top of the phone, not in the display itself. A properly performed screen replacement does not affect Face ID. If Face ID stops working after a screen replacement, it indicates a problem with the repair, not an inherent limitation.
Will True Tone work after iPhone 16 Pro Max screen replacement?
True Tone requires Apple's proprietary display calibration data, which is stored in the original display. Aftermarket replacement screens do not support True Tone. This is a hardware limitation, not a repair quality issue.
Can I replace the iPhone 16 Pro Max screen myself?
It's technically possible for experienced DIYers, but the titanium frame adhesive and Camera Control cable routing make it more difficult than previous models. If you haven't done an iPhone 15 Pro Max repair before, start there. The 16 Pro Max is not a good first iPhone repair.
How long does iPhone 16 Pro Max screen replacement take?
Experienced repair shops complete it in 45-60 minutes. First-time 16 Pro Max repairs typically take 90-120 minutes. Apple Store repairs are same-day with an appointment.
Where to Get iPhone 16 Pro Max Screens in the UK
For repair shops, the key sourcing considerations for 16 Pro Max screens are:
- Verify ProMotion support before ordering — ask suppliers specifically whether the screen supports 1-120Hz adaptive refresh
- Request batch QC documentation — Grade A screens should come with test reports showing brightness, colour accuracy, and touch response data
- Check the connector type — the 16 Pro Max uses a different connector than the 15 Pro Max; confirm compatibility before ordering in bulk
We stock Grade A OLED screens for the iPhone 16 Pro Max with full ProMotion support, batch QC documentation, and a 90-day parts warranty. Volume pricing available for repair shops ordering 5+ units.